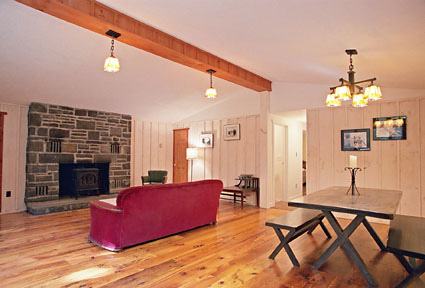
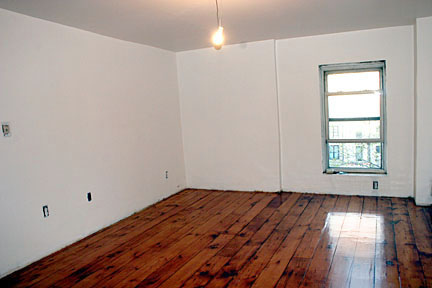
Skip to content

Porta Potty

Porta Potty published on 2 Comments on Porta Potty

Items You Just Can’t Live Without

potty.jpg

Nobody likes to talk about it, but we all need to do it. So, what if you’re renovating a bathroom and it will take days, weeks or months to complete? Yeah, a bucket works fine, but indulge yourself in the luxury of a porta potty!

We bought ours on Ebay from a company called Short’s Marine. The Thetford 135 model is less than $100 and will last about a week before you make your husband empty it. Camping World also sells them, along with the chemicals to go with it.

The chemicals that break down the waste do contain formaldehyde. Supreme Green is eco friendly, but, unfortunately, it doesn’t work as well as those harsh chemicals.

The Zen of Rewiring Antique Fixtures

The Zen of Rewiring Antique Fixtures published on 2 Comments on The Zen of Rewiring Antique Fixtures


fixture.JPG

Disclaimer: We’re not responsible if you fry yourself. This is a summary of what to do. Please click on links for expert advice.

So, you bought yourself an inexpensive, lovely old chandelier from a salvage joint and now you find out that lighting places charge $25 per arm to rewire. Wasn’t that much of a bargain after all, huh? Don’t stress. Rewiring isn’t rocket science.

Tools and Materials You May Need

  • Needle-nose pliers
  • Screwdrivers (small as well as regular size)
  • Lamp wire (Comes in different colors. Keep the fixture color in mind when purchasing.)
  • Wire cutter
  • Wire stripper
  • Wire nuts
  • Electrical tape
  • Continuity tester
  • Sockets (Type depends on fixture. Some antique fixtures may take irregular sockets that need to be special ordered.)

Just Do It

Sit down with your fixture. Take a deep breath. Relax.

Carefully disassemble. Don’t break your irreplaceable glass shades and don’t lose your screws! The fixture may be held together by the finial or screws. To get at the wiring, gently disconnect the sockets from their caps by squeezing or pressing. If you think you might want to use these, test them with a continuity tester. I usually just go for new sockets to be safe. Make sure you don’t take the whole thing apart without remembering where each cord was connected. If you don’t know what you’re doing, it’s a good idea to take this a step at a time.

Replace the old wiring with new lamp cord. For a single-socket fixture, work from the socket up to the mount. For multi socket, feed the cord from above. First mount the socket cap to the fixture, then do the wiring. Connect wires to the socket terminals, route each socket’s cord back through the cap into the fixture. Leave at least 6 inches of wire out of tube and then snap the socket in place. Strip the wires where all cords meet up with the main cord in the body of fixture, then splice with wire nut.

Check with tester before plugging it in. Both for safety and sanity. You don’t want to install fixture only to find out it doesn’t work. D’uh!

How To Resources

Corner Hardware
HGTV
EHow
How Stuff Works

Supplies and Expert Advice

Antique Lamp Supply
Paxton Hardware
Aurora Lampworks
Lamp Doctor
Rt 9 Lamp and Light

Dealing With Mice

Dealing With Mice published on 1 Comment on Dealing With Mice

mouse.jpg

#1. Get a cat. No? Ok, let’s assume you’ve already cleared away all crumbs, put steel wool in holes and placed all food in tupperware bins. You did that already, right?

Mice don’t like the smell of Fresh Cab or Peppermint Oil. Fresh Cab comes in pouches which you can throw in cabinets and behind the fridge, etc. Peppermint Oil can be purchased at any health food store. Just dab a few drops on cotton balls and scatter around in hidden areas.

If this doesn’t work, go to Plan B: the ultrasonic pest repellent. Forget the small ones though. You’ll have to blow at least forty bucks on the dual technology Viatek or Lentek. We’ve used them in 3 separate apartments now and so far, so good. Works on insects too!

Humane Mouse Traps can be purchased through Peta or Dreaming Earth. Just make sure you don’t let your little buddy suffocate or starve in there. Also be advised that there is usually more than one mouse and they may find their way back.

Building Materials: Get ‘Em While You Can!

Building Materials: Get ‘Em While You Can! published on

This was posted on the forum yesterday. Since I haven’t yet figured out how to allow folks to post photos, I asked her to send me some pics so I can post here. Looks good!

Selling off contents of a modified Post and Beam house in Greenwich, CT. Walls/ceilings of knotty pine, white oak and red oak floors,fir stairs, lofts, loft railings,, Exterior/interior doors, Anderson casements, picture windows, Velux sky lights, French doors, double French doors XO, 6 ft sliders, Trane XL 80 gas furnace, ducting, 40 gal gas hot water tank, toilets, bidet, whirlpool tub, frameless shower doors, electric garage motor,amd more. All materials in EXCELLENT condition. Buyer removes. Cash only.

Also have materials in 9 other houses, includine 4 gorgeous kitchens which are on my website and available NOW. All in EXCELLENT condition. Contact Cathy @203-869-5365 or deepdiscount@optonline.net

If you are a “Dumpster Diver”, and you know if you are one, get to know me! Check out my web site www.deepdiscountdemolition.com, email me your address and I’ll add you to my list for notice of sales. Let me know what you need, if I don’t have it today, I will soon. Recycle, get great stuff at “deep discount” , Thanks

outpost.jpg

intdemo.jpg


sliders.JPG

Silent Paint Remover

Silent Paint Remover published on 4 Comments on Silent Paint Remover

Tools I Can’t Live Without

spr.jpg

A friend turned me on to the Silent Paint Remover only after I finished stripping 3 floors of my brownstone. With a whole room of wainscoting to go, it was still worth it for me to give it a shot.

Unlike a heat gun, the SPR heats a 5″x12″ area at once, so it goes lickety-split. You’ll still need the heat gun or chemicals for small corners and clean up, but I’d highly recommend this tool to get through large areas with multiple coats of paint. It can save days, maybe weeks, on large projects.

If you’re working on a flat surface, you can move it along to heat the next area while you continue to scrape. For vertical surfaces, I invested in the hands free kit, which saves my arms, but isn’t much faster as it is inconvenient to make adjustments each time you move along.

Although it’s more environmentally friendly than harsh chemicals, you still need to wear a mask and gloves if you are working with lead paint. You must be mindful of your wood with this tool. Don’t leave it in place too long. It WILL burn your surface! When you see smoke, it’s time to remove it.

For more details and where to purchase, see following links.

House in Progress
Silent Paint Remover
Air Nailers
Eco Strip

Safety First!

Safety First! published on 4 Comments on Safety First!

suit.jpeg

mask.jpg

So, it’s your first DIY project. Before you start ripping into your house, you should have a few safety items on hand.

Just assume that any home built prior to 1978 has lead paint. Lead is only dangerous when it’s ingested or inhaled. Tip #1: Don’t eat it. If you’re doing demolition, scraping walls or stripping paint off moulding, you need a good mask! Not those flimsy dust masks….a NIOSH certified, HEPA filter mask. There are different filters for various hazardous materials. Ask someone if you’re not sure which one to buy.

Keep the lead infested room well sealed off. Wear one of them “Silkwood” suits or leave your clothes and shoes behind in the room when you’re finished. A HEPA vacuum is recommended for clean up, as well as wiping down surfaces with damp rags. DO NOT LET KIDS OR PETS IN AREA!!

Protect your hands! Use heavy construction gloves for demo and chemical resistant gloves for paint stripping. DO NOT chemical strip paint with common latex gloves. They will last about 1 second.

Goggles are necessary if you’re demoing a ceiling, cutting tiles or wood or working with anything that might go flying into your eye. Chemicals and even paint can fly into your eyes if you’re clumsy enough.

Ear plugs won’t take up space or set you back too much. It’s a good thing to have handy. Some of those power tools are noisy!

Better details here:

EPA
NIOSH
Consumer Product Safety
Respiratory Protection Supply
North Safety Products

Photographing Your House for Sale

Photographing Your House for Sale published on 4 Comments on Photographing Your House for Sale

webdrbef.jpg
Before: Quick Snap


wdraft2.jpg
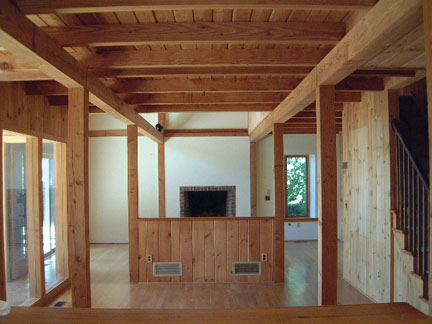
Tripod with Wide Angle. Focal point is the fireplace, not dining room table.
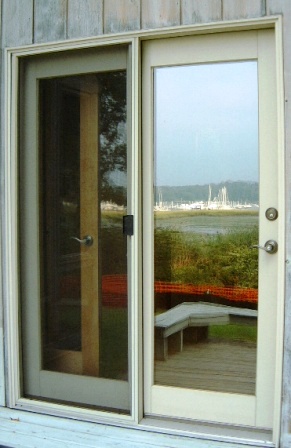
 

Snappie
Before: Quick Snap


wdraft1.jpg

Tripod with Wide Angle. Polished table and opened curtains.


Hit Me With Your Best Shot

Since this site will be focusing on DIY, I realized that some industry professionals may accuse me of putting their livelihoods in jeopardy. To be fair, the first DIY tip I’m offering is that of my own profession: photography.

Before you even think of whipping out your camera, prepare your subject. Make sure you clear away clutter, make your bed, close toilet lids.

You’ll need proper camera equipment. If you don’t own any, you can rent at Alkit, Adorama, Calumet or Fotocare to name a few. Make sure you have a camera that is capable of manual exposures. You’ll also want a wide lens on this baby. There’s nothing I hate to see more than a photo of someone’s furniture because the lens wasn’t wide enough to capture the whole room. A tripod is the final key ingredient.

I sometimes light the room, but it’s fine to shoot solely with natural light. Roll up all window shades, open curtains, turn on all lights and set your camera to a slow shutter speed to pick up ambient light. 400 ISO should be sufficient with a tripod. An 8+ F stop should give you enough depth of field. You must read the meter for your exact exposure. If you have an on camera flash, feel free to use it for fill and color balance.

Obviously, you want to focus on the room’s best features: light and detail. I always like to get those window in….with sun shining!

If you shoot large RAW format, you can edit the photos without doing damage to the files. Make all adjustments while the photos are still a large resolution and then change it to a smaller 72 DPI for online viewing.

And there you have it. My trade secrets.

Photos:

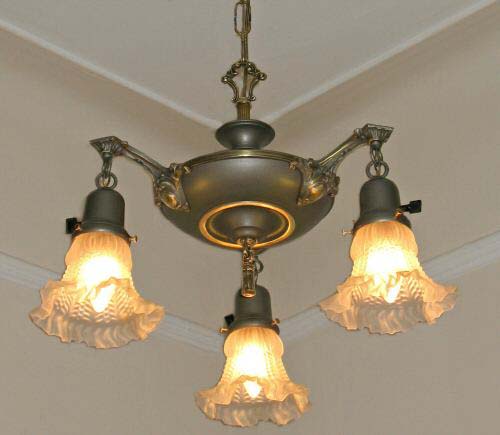
B: The focus is on the dining room table. There are burnt out light bulbs. The image is not out of focus, but rather pixelated due to it being worked on at too low a resolution.

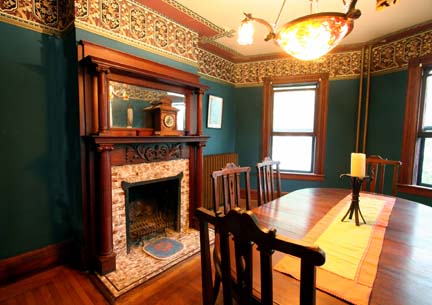
A: A wider lens allows us to see the 2 windows in the room. And oh, what’s this? Wood floors! Didn’t see that in the first image! The long exposure, plus fill flash makes the main feature of the room (the mantle) pop.

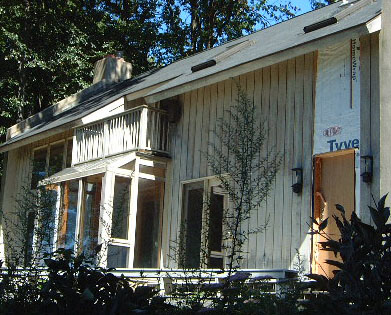
B1: Hmm, dusty dining room table.

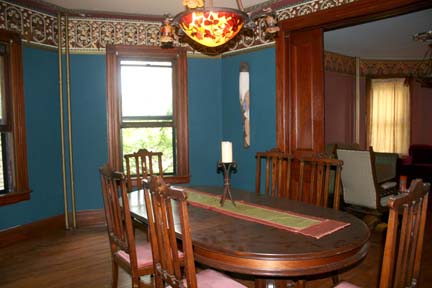
A1: Again, wider lens allows us to see more. Whereas the first image concentrates on the one room (or just the table, really), here we can see the full double parlor in all it’s glory. The second room is lit, bringing it into the photo as well.

Reclaimed Flooring

Reclaimed Flooring published on 5 Comments on Reclaimed Flooring

5 years ago, we paid around $6000 for reclaimed wide plank pine for a 600 square foot room (installed and finished). And that was the best price. Maybe we had more money to throw around back then, but we would never dream of paying that much for a single floor now.

Reclaimed wide plank is still pricey, but many companies run internet specials. There are also smaller local mills that may charge less.

The least expensive option, if it exists in your home, is to carefully pull up the existing subfloor/planks and scrape them down, then reinstall. Tons of work, but saving all that dough…..priceless.

kingstonlr.jpg
$6000 Floor, Marbletown, NY

planks.jpg
Original Planks, Bed Stuy Home

4fl.jpg
Scraped and Installed Ourselves: $0

Companies Offering Internet Specials

Aged Woods

Antique and Vintage Woods

Craftmark

Douglas Fir Floors

Old Wood Workshop

The Woods

Vintage Timber

Whiskey Wood

Primary Sidebar