Skip to content

Install A Washing Machine

Install A Washing Machine published on 1 Comment on Install A Washing Machine

Washing Machine Installation

This isn’t so much a DIY as a “You can do it” post. Reason being, replacing an existing washing machine with a new one is as easy as assembling Ikea furniture.

I installed my first washing machine yesterday. Thought I’d have to wait for hubby because I don’t deal with plumbing or electric. “Nothing dangerous” is my motto. Had it been a dryer, I would not have trusted myself with the gas connections, but what’s the worst that can happen with water? A flood?

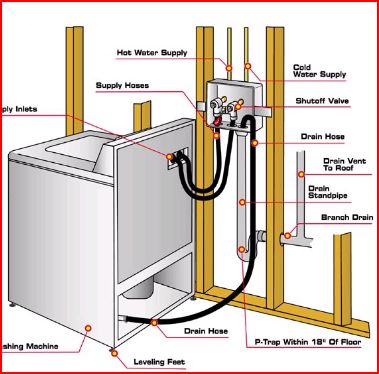
Assuming your laundry area is already set up for a washer, it’s easy. If you’re going about this from scratch, it will require installing water supply and drainage, both beyond my expertise.

Ok, so you’re just replacing, right? A brand new washer will come with directions, some tools and hoses. Save the hoses from your old one if you’re installing second hand. Of course, you can always purchase new ones if need be.

1. The first thing you want to do on a brand new install is remove the shipping bolts. This part takes longer than the rest of it, but it’s very important.

2. The water line hoses on my LG were marked red and blue for hot and cold. Hook those into the hot and cold intakes on the machine. Connect the other ends to the faucet. Hand tighten as much as you can, then use the wrench. Don’t over tighten, but you don’t want a leak either.

3. Drain hose comes connected to machine. There’s a support that’s easy enough to attach to the other end. Stick that end in drain or slop sink (mine is a sink).

4. Plug it in and run a test to check for leaks. If all is good, move it into it’s permanent position.

5. Level the machine with the adjustments on bottom. Personally, I didn’t use a level….just stopped it from wobbling.

6. Do the laundry.

The wrench they provided didn’t work on everything so I’d say it’s handy to have an adjustable wrench. Maybe a screwdriver would come in handy too.

Yeah, that’s it. Not so bad, huh?

Weekend Fixes

Weekend Fixes published on 1 Comment on Weekend Fixes

IMG_0132

So? How was your Thanksgiving weekend? Did you sit around and eat or catch up on some much needed work around the house? We got to check off some lil bits of renovation here at Casa Reclaimed Home.

Over a year ago, our cats tried to kill us by starting a fire. It was behind an old kitchenette counter from our pied a terre days that we were going to remove anyway. The burnt wall sat that way for, oh, a year. Then we finally took the outlet out and re-sheetrocked.

This weekend we got around to matching the wainscoting in the rest of the room. Ok, so it doesn’t match but we made something much cooler.

photo

We used a couple of old doors for the wainscoting. A DIY tutorial will be posted once the molding is finished and all is patched and painted, but you get the idea. Basically, cut the doors in half and line them up. Bam! There’s your tutorial.

photo 1

Our marble window sill was left half finished exactly two years ago. All that was left to do was to add a piece of molding to the front. Cutting, nailing and gluing the trim took all of 10 minutes after two years of contemplation.

photo 3

BTW, here ya go, in case you missed the tutorial on the window radiator enclosure.

It will probably take another 2 years to fill nail holes and touch up.

Thankful For These Handy Items

Thankful For These Handy Items published on 1 Comment on Thankful For These Handy Items

thankful-art

1. Silent Paint Remover. Shaves hours off of paint stripping. It’s not for every job, but a big, flat surface like a door or wainscoting? No other way. The cost of the unit will pay for itself in the money saved from chemicals.

2. Hammer Drill. Small. Light. Makes the work that much more fun and easy.

3. Howard’s Restor-A-Finish. If you don’t know the first thing about restoring wood, no worries. This stuff is magic! Just make sure you match the color.

4. Mohawk Stains. You can pick up Minwax stain in any store, anywhere. It’s like they have a monopoly on stain. But you know what? Minwax sucks. Spend a couple of extra bucks for a good stain. You’re not even spending more because you can do it with fewer coats.

5. Epifanes Rubbed Varnish. Another magical wood sealer. Again, forget Minwax. This over Mohawk will make your wood look a like a pro did it.

6. Shellac Primer. It has the stain and odor blocking properties of oil based primer but dries quicker than latex. Goes on thin and it’s easy to use.

7. Vinegar.  White vinegar cleans everything from windows to brass to wood floors. It’s always handy to have around the house.

8. WD-40. Oh man, what would we do without WD-40? The website claims over 2000 uses for this lubricant. It helped me save some rusted hand tools after Sandy. And for that, I’m thankful.

9. Tin foil and plastic bags. Did you know that scrubbing chrome with tin foil and water will eliminate rust? Well, you do now! Another great use for tin foil is to cover paint strippers such as Peel Away so they won’t dry out. For things like ceiling medallions, a light plastic bag sticks even better.

10. Staple Gun. Dare I say it’s better than duct tape? Of course an air nailer is more useful for renovations, but hey, that’s big and heavy. I can reupholster a chair with a staple gun. I can and I have. Didn’t say it looked great.

Celebrating The Turkey Without Killing It

Celebrating The Turkey Without Killing It published on

turkeys+in+a+row

Hey kids! Here’s some fun, edible goofiness just in time for Thanksgiving. These desserts, place settings and center pieces are all tasty and cruelty free. Some are even good fer ya! Click on each image for the source and how-to, but remember not to go nuts with directions. They are all easy enough to recreate with your own special touch.

turkey-vegetable-tray

Oreo-Turkey-Pops-For-Kids-1024x831

1dec34d46509f45e5ae109b62c4c0f3a

1ab1688a30153683d9c86b2f4d4977fb

IMG_0144

Winterize!

Winterize! published on 1 Comment on Winterize!

Get ready for cold weather - winterize your home

Ok, so it’s probably safe to say that summer is over. The days are getting shorter and the temps are dropping into winter range at night. Time to get ready whether you’re a renter or homeowner.

Let’s start with the energy saving tips.

1. Air conditioners out of windows.
2. Align and insulate around windows so there are no drafts.
3. Install exterior door insulation strips or throw a towel down if too lazy to do that.
4. This one is a bigger job but it should be done at some point….Insulate attic crawl spaces and basement ceilings.
5. Take out your winter clothes, fuzzy pj’s and big blankies. If you walk around the house in a tank top and shorts and turn the heat up so you can be comfortable, you are an energy sucking vampire.
6. Program thermostat to chill out while at work and sleep.
7. Insulate any exposed pipes and ductwork. If it’s in the walls, whomever installed them, should have done this if they’re near exterior walls.

Safety.

1. Turn off exterior water supply such as hose. They will freeze and your pipes will burst. You don’t want that.
2. Got snow shovel and salt? Don’t wait until the big storm when there’s a rush on them. Be prepared.
3. Clean gutters so they don’t turn into ice dams. Yeah, you gotta climb on the roof.
4. How old is your boiler? Have you been maintaining it? Filters clean? Do you need to drain water?
5. Forced air systems have air ducts that trap all sorts of yucky dust and debris, especially if you have pets. You can get them professionally cleaned every few years but make sure to vacuum the floor vents regularly.

Reclaimed Kitchen Islands

Reclaimed Kitchen Islands published on

4078ca8b7d7afa0b63c0bc94b47a8176

Sometimes a kitchen island is the working hub of the cook’s room, including stove and sink, but sometimes it’s just a bit of extra counter space. Islands are a great option for kitchens that aren’t quite big enough to be eat-in. Stick some stools under that counter and call it a day!

I pulled some pretty pictures for y’all. Ok, for me. I’m thinking of putting in an island. To dish out my restaurant deliveries.

1db39d610f69451a9a300e17c61a516f

Build it from scratch with some reclaimed lumber.

645fe7c3073b48fabe0d2830685ce099

Looks as if the wood counter legs can be tucked away and perhaps counter can swivel on top of other?

4b054a80d27a67dfbfafa09790840d1f

Awesome and way too easy. Of course, it need not be an island.

haynes-roberts-8 copy

Yes, those are antique iceboxes being used as the base. Yes, that kitchen is massive.

4a5d2cd15807588a7a77afe8e316f17d

Lookit. ANYBODY can do this. You don’t need skills. M’kay? And it’s a friggin’ fantastic idea.

Recycled Sheetrock Scraps

Recycled Sheetrock Scraps published on

photo

Don’t throw away those drywall scraps. If you keep what you cut you can reuse it in an art project. Shown here are very levelheaded colors for an office building. There are so many options with this. Go bold! Do photo transfers! Use textures! Caulk the seams!

It’s easy enough to do. Just glue the pieces to a board. You can even paint them before laying them out if you suck at painting.

PS: Of course you can do it with your wood scraps too.

Concrete Wood

Concrete Wood published on

woodcrete

Wood is the esthetic building material of choice when it comes to fencing, floors and decking. The problem with wood is that it starts to wear down after time. Longer lasting options would be Trex, laminate or PVC fencing to name a few. It just feels wrong to replace a natural material with plastic. *It should be noted that Trex is mostly made up of recycled materials.*

We don’t always think of concrete as an alternative to wood, but it’s stronger and lasts a lot longer all while looking more tasteful than other synthetic options. Think of polished concrete countertops and floors.

Unpolished concrete is easier to DIY for the less skilled laborer and can end up looking just as fabulous. As with any concrete job, the form would have to be built, concrete poured and form removed when dry. The “wooden fence” above was created by such a technique. The bad news is that it’s the double the amount of work as installing a wood fence. You basically have to construct two fences and pour the concrete in the middle. If only one side is to be seen, you can cheat with a sheet of plywood on the hidden side. When the wood is removed, voilà, you have a “wooden fence” made out of a material that will last a lifetime.

Concrete can be tinted and let’s not forgot that it’s a fairly inexpensive material. Although controversial for the sake of nostalgia, many wooden boardwalks are now being replaced by concrete.

How to Save Time and Money When You Move

How to Save Time and Money When You Move published on

95389_Cat-Stuck-in-Moving-Box_620

Guest Author: Caroline Casetti of The Humble Haven

I’ve always been a transient person, and I’ve always enjoyed the feeling of going someplace new.  However, as a life-long hoarder, I know first-hand how high the impounding costs of moving can really be.  That’s why I’ve created this concise list to help you make a few money-conscious decisions that will ease your move and help alleviate the inevitable stress you’re more than likely to put on your bank account.

Step 1:

First off, the most important—and possibly most overlooked—thing to do before you move is to plan ahead. Plan what you want to take with you, how you’ll be transporting everything, and figure out what will and will not fit in your new pad.

Start by going through your belongings and deciding what you want to take with you and what you can live without.  For the more sentimentally-inclined, this may be a difficult process, so I’ve designed a full-proof way to help you decide what’s worth keeping: If it’s dusty, if you forgot you owned it, or if you haven’t seen it in years, chances are you won’t miss it.

Also included in the first of a three-step process is to make a list of all your larger furniture.  Depending on where you’re moving, you may not have enough room for some of your larger items, so it’s important to take note of these little details before the situation arises, so you can nip this potential problem in the bud before you ever have to worry about it.

Step 2:

Once you’ve gone through and made a list of all the things you do and don’t need, your next step is to decide how to get rid of them.  You can either donate your old things or sell them to make a profit.  You’d be surprised to find how many obscure buyers are actually out there, and if you’re willing to put in the extra effort, the fruits of your labor will certainly pay off.

However, if you don’t have room to take a few of your more cherished belongings and don’t want to have to part with them, a third option is finding self-storage.  Storage is great at giving you peace of mind, and is another wonderful way to help ease your move.   Look for units that are within a few mile radius of your new home, and be sure to find one that has both 24-hour surveillance and climate control.

Step 3:

Now that the whole organizing debacle is out of the way, the next step is to start packing.  Though it may be easier to simply hire movers to do all the hard work for you, a great way to save money is to simply do it all yourself.

There are a few very simple guidelines you should follow when you’re packing on a budget:

•    Never buy boxes.  Cardboard boxes are a dime a dozen, and there are plenty of stores that are willing to simply give them away.  A few great places to check are local grocery stores, local coffee shops (I get almost all of mine from Starbucks) and food service stores.
•    Be sure to pack everything nice and tight, and put as much newspaper as you can in there to make sure everything’s secure.  If your box is packed and you can still hear its contents moving around inside, you need to add more paper.  Remember to properly label your boxes too, as it’s easy to confuse a fragile box for a durable one.
•    Try shipping a few of your things that simply won’t fit into your aforementioned boxes.  Depending on where you live, there may even be incentives for shipping in bulk.
Take it from me, proper planning and accurate execution is the way to go. To save yourself a lot of time and money, be sure you’ve planned every detail of your move.   Keeping tabs on all your belongings will help make your move a breeze.

Occupied

Occupied published on

occupyourhome4250contrast

It’s been nearly a year since I started renovations on the Rockaway house. I can finally say that both apartments are fully occupied now and I get to have my life back!

The project was meant to be a flip that would take a few months. Ok, so it took a bit longer with some minor and major disasters. Lemme fill you in on my setbacks. May I?

1. Disaster One. Crappy contractors. I can’t even begin to imagine how badly contractors rip off folks who don’t know a thing about the renovation process. When pipes separate and fall inside the wall and paint starts to peel after a few days, you MUST know that shortcuts were taken, right? This is why I DIY. Unless you want to spend the big bucks on a high end licensed contractor who comes with a thousand percent positive referrals, be verrrry careful.

Slow contractors who didn’t know what they were doing, contractors whose work had to be done over cost me an extra month or two in the beginning (and throughout). A month that I might have been able to unload the house on some poor, unsuspecting sucker prior to….

2. Disaster Two. Sandy. Yes, Superstorm Sandy is listed second to bad contractors. Not that I would ever want for anyone to go through that again, but believe it or not, the combination of incompetent team members set me back worse than the worst storm of the century. All in all, I was lucky. Just basement damage and some siding. Some pocket change from insurance that helped pay for the new boiler. It wasn’t so much the money that got to me as it was the time and momentum that was lost. With an NYC gas shortage and no heat or power at the house, this would set me back close to 2 months.

3. Disaster Three. Oops. Wrecked my car. Well, that’s what we get for trying to spend New Year’s Day working on the house. Some dumb bitch ran the red light and next thing we know, the car was totaled. Another bad luck/good luck story: We walked away! Set back of about 2 weeks until I dealt with the situation and got another car to get over to the house. Remember that the trains were not running after the storm.

Ok, those were the major setbacks. What do setbacks mean? It means you can’t fold. You have to readjust the original plan. With the real estate market down in Rockaway after the hurricane, I knew I’d be stuck with the house for awhile and I’d have to rent instead of sell. On the plus side, I’ll be earning back some money I lost.

This could all be blessings in disguise. The universe works in mysterious ways. It fucks with you but for good reason. Putting me through tests? Hell yeah. Making me hang on to the house until Rockaway rebuilds stronger and better than ever, so my house will be worth a small fortune?

Let’s hope so.

Museum Admission Tags

Museum Admission Tags published on

IMG_3750

The Metropolitan Museum is giving up on their iconic admission tags. When I worked at The Met for whole three years of my life, I saved all of my buttons if I didn’t give them away to visitors as a form of recycling. Admission to The Met is now, as it has always been, “suggested” so you can give a penny and get in. Lots of people don’t realize and pay the full amount. Not that there’s anything wrong with that, it’s a great institution that should be supported if the money is there to give. I just happen to believe that art should be available to everyone and I wish that every museum would have a sliding scale. Hear that MOMA?

So, the tags. This post was meant to be about all the lovely museum admission button art created by folks over the years. Surely if I was making earrings and bracelets out of them (it was the 80’s), everyone else is doing the same. Not so much.

I only found a handful of creations online. Very disappointing. WTF, people?

dt424_529

thinker-by-rodin

museum-earrings

Transformations

Transformations published on 1 Comment on Transformations

lr

What good is a renovation blog without before and after pictures?

The living room and bedrooms were mostly cosmetic but bathrooms and kitchens were gutted due to wood rot from leaky pipes and drains. I don’t think any of the original plumbing still exists in the house now.

kitchen

upstairs

pinkbath

A closet was taken down on the right side to add more width. A partition wall separating the toilet from the tub was also removed, letting the window light hit the rest of the bathroom.

downkitch

We totally flipped the first floor kitchen around. You’re not even looking at the same area, so technically it’s not really a before and after.

Cabinet Interiors

Cabinet Interiors published on

intcab

The kitchen cabinets that remained in place during the entire renovation got a fresh coat of paint on the outside. But ah, the interiors were still nasty. They were skimcoated and primed but that still wasn’t doing the trick.

Why yellow gloss? I had it in the house. It looks soooo much for fabulous than boring ole’ white. And it totally goes with my Mexican theme.

Oddly enough, I came home last night after painting and prepared fajitas for dinner.

When Rewiring is a Bitch

When Rewiring is a Bitch published on

8936169736_a9b868d320_o

Antique light fixtures to me are like shoes to other women. I collect them. It’s easy enough because they don’t take up much space. I have my practical fixtures and my dressy ones. Ya know.

Ninety percent of the time they need to be rewired. And eighty percent of that time, it’s ok. But sometimes a fixture becomes a pain in the arse and it’s always the one I realllllly want to use in a certain spot.

Case in hand is this chandelier I just HAD TO put in the kitchen. It had old cloth wire that I cut and tried to pull out when I spray painted. Didn’t come out. My husband managed to get a few strands out but the new wire just wasn’t going through.

What to do?

Well, I’d love to know what a real lighting person would have done but this scrappy DIY crew (Hubby and Moi) drilled holes close enough to the socket and ran wire on the outside of the arms. The wires were painted the same black and voila (!)…you can’t see them. FYI, the photo below was taken during the process, not after we painted. Just making sure you know that.

Anyone got an easier way?

rewire

Primary Sidebar