Skip to content

Bathtub Reglazing

Bathtub Reglazing published on 2 Comments on Bathtub Reglazing

aftertub

Here’s how I know recycled building materials are more popular now than ever before. For the first time in my 19 years of renovations, I couldn’t find a free clawfoot tub. Our very first house, my husband got one from a work buddy who was renovating and another of his buddies, a firefighter, helped carry it in. That helpful firefighter later lost his life in 9/11. On other houses, we ended up with yet another friend’s tub after their renovation and a Craigslist free posting.

Fast forward to 2012 and the only free tub I could come up with was up three flights in a Victorian attic. I’m cheap but not that cheap. Those things are heavy!

I paid Brooklyn salvage king Eddie Hibbert $100 including delivery to Rockaway. When he took the tub out of the van, it was not the same one I chose at his shop but I didn’t have the heart to make him haul it back. Not after all the discounts he’s been giving me over the years.

So, it needed reglazing.

I’ve actually had someone reglaze a tub for me before and it didn’t work out so well. These were the days before social media. The internet existed but there was nowhere to complain about guys like this. The tub started peeling within a month and my only recourse was BBB which didn’t get me too far.

This time I went with Al and Dave whom have been in the business for 40 years and come highly recommended. Five hundred bucks including stripping and tax makes this the priciest tub I’ve ever bought. It looks good. Not perfect because the tub was in bad shape, but I don’t need perfection in an antique. The only thing that makes me nervous is that I do see drips, which makes me think it’s going to start peeling. I hear that these things never really last but I can’t imagine throwing away a cast iron tub because it’s impossible to restore.

The process took a bit over three hours to strip and paint. It was dry to the touch a few hours later but cannot be used for about three days. The painting room (bathroom) should be warm, well ventilated and dust free.

Fingers crossed it will last. If not, at least these guys can be held accountable unlike the first hack.

Before shot:

beforetub

Goodbye Pink Bathroom

Goodbye Pink Bathroom published on 2 Comments on Goodbye Pink Bathroom

IMG_8629

Sometimes I see pre-renovation photos and I ask why the hell people would get rid of anything as awesome as a pink bathroom to put in new dreck. Well, now I know first hand.

It’s been a difficult few weeks trying to save my pink bathroom. At first, I was going to keep it fully intact. I just wanted to take down the ugly fiberglass shower enclosure and wall behind the tub and get rid of some weird floor “junk” behind the toilet. Once I ripped that down I saw that it was hiding rotted wood.

The tub is sitting on damaged joists. There is a massive hole in the floor under the toilet. When I took down the wall that was used to enclose the shower plumbing, the room looked so much bigger and brighter.

I thought I’d salvage any pink wall and floor tile that I could. Now it’s clear that it all needs to go so I can do it properly. The good news is that I can extend the room into an adjoining closet and have a larger bathroom.

Right now I intend to do everything possible to keep my pink tub and toilet, but if I don’t find proper matching tiles, then someone else can benefit from these fabulous items. Fingers crossed it’s me though.

That 70’s Bathroom

That 70’s Bathroom published on

photo

As in vogue as pink bathrooms are nowadays, the same doesn’t really hold true for olive, does it? I mean, it’s a nice enough color but olive kitchens and baths just don’t stand the test of time. Is it because they’re more 70’s than 50’s? Will they ever come back? Who knows? Mom jeans and frosted hair are in….well, the kids are wearing them….or was that like 2 years ago already?

Anyway, this bathroom was in my mom’s friend’s house in Staten Island. Italians. That’s a mirrored shower door so you can watch yourself pee. I like the location of the bidet just across from the toilet. You can save time in the morning and brush your teeth while you’re taking a dump.

Shower Stalls

Shower Stalls published on 2 Comments on Shower Stalls

Love these “French” shower doors from Peppermint Bliss. She didn’t say where she got them from but word on the street is that you can use factory windows to achieve this look (which is probably what is shown in the picture).

Clawfoot shower base with new chrome “antique” enclosure. Via Little Green Notebook.

Corrugated metal is showing up everywhere these days. Via Apartment Therapy.

These reclaimed windows are a nice concept but you would want to seal them up before using them in your shower. Via Apartment Therapy.

I Need This Bathtub

I Need This Bathtub published on 7 Comments on I Need This Bathtub

pinksicisshoe.jpg

This has gotta be the coolest bathtub out there! Not only is it a shoe, it’s a pimped out hooker shoe! Would I wear this style on my feet? No. Would I want to design my entire bathroom around it? Hells yeah!!

The Sicis shoe tubs by Italian designer Massimiliano Della Monaca hit the internet back in May, but I just noticed it. The company has glass mosaic collections which include lighting and floors. There’s a showroom in Soho and the line is carried by Wayne Tile in Ramsey, NJ.

Now, before you run out with credit card in hand, a word about the price. This tub will run you somewhere around $20k.

However! If 2000 of you donated just $10 apiece, you could pay for my tub. Isn’t it better if one of us is able to purchase it rather than none of us?

bathtub.jpg

Lighting Countertops

Lighting Countertops published on 2 Comments on Lighting Countertops

 amber-onyx-2.jpg

Web Urbanist recently featured ten of the coolest counter and surface material designs. Although they’re all really beautiful, I noticed that the more spectacular ones are lit from behind.

So my question is, do you really need to spend a fortune on semi precious gemstones or lava to get that same glowing effect? Sure, if you have the money, be my guest (and loan me some). But I’m thinking that you can probably achieve a very cool effect by backlighting just about anything.

Some ideas:

1. Colored glass or plexi

2. Individual glass marbles, tiles or quartz stones

3. Transparent paint for glass

4. Stained glass

5. Embedded anything in resin

6. Punched metal

7. Old photographic transparencies

8. Strings of Christmas lights under clear glass

Now obviously if these are surfaces where water will penetrate, you’ll need to protect them. Do I even have to mention that any paint, holey metal or photo should be underneath the glass? And if it’s a countertop, make sure you’ve checked into heat, breakage and seams? But you knew that already, right?

The lighting is something that can be adjusted. You may not want it evenly lit. Perhaps some shadow areas would give a more dramatic effect. Just make sure you have your wiring and spacial issues worked out in advance! Keep in mind that lighting from behind will take up at least a couple inches, and that’s some narrow lighting I’m talking about.

Creating A Bathroom Sanctuary

Creating A Bathroom Sanctuary published on 2 Comments on Creating A Bathroom Sanctuary

 burgbad-sanctuary-garden-bathroom-4.jpg

Not your average outhouse.

The bathroom is one of my favorite rooms in a house. It’s certainly more fun to design than a living room. And between you and me, I spend more time in the bathroom than I do in the kitchen. I mean, think about it…what’s more personal than a trip to the bathroom? Why shouldn’t it be a sanctuary?

Nobody really has much time to bathe these days, but we all like to pretend we do. I’ve gone to great lengths to secure salvaged claw foot tubs in every single one of my renovations even though I’ve taken about 5 baths in the last 10 years. The bathtub is the ultimate home sanctuary fantasy. (Although mine is the toilet.) How many people get Whirlpool tubs or Japanese soaking tubs only to use them a couple of times? But it’s nice to have.

More practical is the steam shower. But since I can’t afford it, I’m a hater. It’s an unnecessary luxury.  A low flow shower head will do the trick of getting me clean. If I need a massage, I can get a one every week for the same price as some of these showers. If I need to open my sinuses, a pot of hot water or neti pot will do the trick.

So let’s get to my favorite: The Toilet.

2seat.jpg

I want a two seater.

throne.jpg

I want a throne.

callaliles_front.jpg

I want a work of art.

Of course the overall feel of the room should engage all senses.  Tranquil wall colors and good natural light. Perhaps some dimmers, candles or sconces to set the romantic tone (bath sex). Aromatherapy. A towel warmer. Soaps that are nicer than your average Bronners. An ipod deck or whatever you dinosaurs use for music. You get the point?

All this talk of sanctuaries makes me wish my bathroom wasn’t a mold filled, cat pee stinking room in need of renovation. Ok, back to reality.

Ehow: Goofy French Spa Bathroom

A Slice of Brooklyn in Glasgow, Scotland

A Slice of Brooklyn in Glasgow, Scotland published on 9 Comments on A Slice of Brooklyn in Glasgow, Scotland

station.jpg

The Station. Photo by SerenityLife
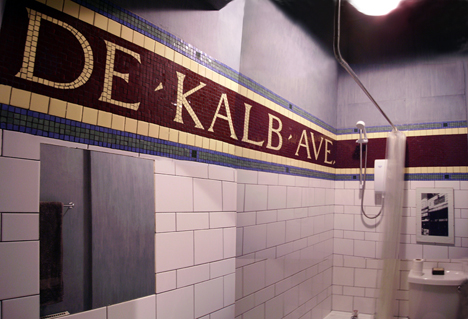
 

dekalb-montage.jpg

The Bathroom


Author: Travis the Trannyboi

21 years ago I arrived in New York City from Scotland to visit pb, now of Reclaimed Home fame, and was immediatedly fascinated by The Subway. I was an undergrad painting student at the time, and returned to Scotland to begin making full-size replicas of mosaic-ed station names, complete with grafitti and running-water staining. Kind of like the Boyle Family’s work, but with walls. At the time, i remember saying that if I ever bought a flat, I would tile my bathroom with a New York subway station name.

Ten years later: my sister and I buy a tenement flat in Glasgow. Built round the turn of the last century, Glasgow’s four-storey tenements of a certain size are not known for their bathrooms. Much of the population would still have been using public bathhouses, so the mod-con of the day was an inside toilet and nothing else. An otherwise well-proportioned flat with two large bedrooms and a 20′ bay-windowed living room has a bathroom the size of a cupboard with a door that opens out the way. A council refurbishment scheme had enlarged the original 4′ x 4′ room to be big enough to accommodate a shower, but it’s a tight fit. Here was my chance to do the mosaic. I decided on my local station on that first NY trip – DeKalb Avenue.

bathroom-after.JPG

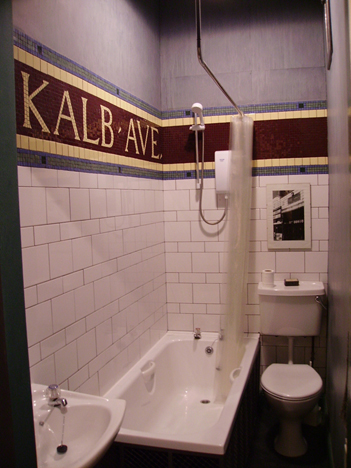
At a tile supplier who would sell tiles singly, I found close enough matches for the colours of the real station mosaic, and then had to labouriously cut the tiles up into hundreds of half-inch squares. I tiled the brick pattern first, then laid in the two rows of stripes before starting on the mosaic proper. I drew the lettering on the wall and filled in the letters first, using tile nibblers to get the exact shapes. You have to allow for quite a bit of wastage at this stage. The background was filled in after the letters had set, with the whole thing finished with black grout for that 100 year-old subway grime effect.

dekalb-detail.JPG

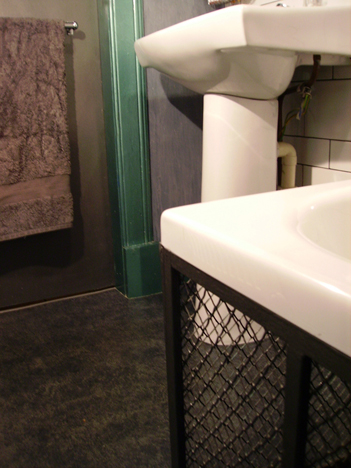
The walls and ceiling are painted in a kind of concrete paint effect, with the woodwork done in green”Hammerite” paint – evil fumes, but a great look suggestive of Victorian glazed brickwork. Rather than box the bath in with solid panels, there’s a frame with painted wire mesh of the kind often seen in the Subway. The photo of a Brooklyn station entrance, which covers the access to the water main was taken by pb. It’s been a great way to distract from the smallness of the room, and visitors to the flat always open the bathroom door with a “Wow!”

Before, during and after photos

DIY This Pricey Vanity

DIY This Pricey Vanity published on 2 Comments on DIY This Pricey Vanity

gruppoatma-vanity-delichon1.jpg

You know what? I don’t even know the price of this Gruppo Atma bathroom furniture on Trendir. I can only assume it’s out of reach. I love it! But I’m one of those people who says “I can do that myself.”

gruppoatma-vanity-delichon4.jpg

Seems easy enough. Take a plain, boring (used) cabinet…even Ikea will do. Get some old frames. They may have to be new frames if you can’t find matching. Search antiques/salvage shops for legs. Paint the whole thing and bam! You’ve got yourself a fancy cabinet for a fraction of the cost. Best of all….you did it yourself.

And what do we think of this mirror vanity below, also from Trendir? I’m not sure about it.

altamarea-vanity-secjo-4.jpg

Virtual Faucet Creator

Virtual Faucet Creator published on 1 Comment on Virtual Faucet Creator

faucet.jpg

Create your dream faucet! California Faucets offers online design software that allows customers to choose any handle, spout and finish they desire. You can start from scratch or modify an existing faucet.

Once finished, you print it out and bring it to a dealer, where they order your custom design. It would be even better if you can just shoot it off to them via the internet.

I don’t need a faucet at the moment but I want to do it just for the heck of it.

Via Materialicious

Primary Sidebar