Skip to content

DIY: Repairing Cracked Plaster

DIY: Repairing Cracked Plaster published on 2 Comments on DIY: Repairing Cracked Plaster

drtr106_1fc_e.jpg

The following is a simple way to repair hairline cracks. If your walls are badly damaged or need to be smoothed out completely, see the link below.

Tools and Materials:

Utility knife
Putty knives (3″-10″)
Spray bottle
Joint Compound
Mesh tape (if needed)
Structolite (if needed)

1. You have to make it worse before it gets better. Take your knife (or similar tool) and dig out the crack. You have to widen it enough (about 1/8″) so the compound will adhere to the interior wall, not just cover it like a band aid.

2. Get rid of loose dust with a brush or vacuum. Spray it down to dampen, not soak. Wipe the wall down. You only want the crack to be wet.

3. If there were no disasters, you’re ready for the joint compound. If the wall started crumbling alittle more than you wanted, you should fill the gaps with Structolite or use mesh tape before applying compound.

4. Fill the crevice with the compound. Smooth the surface with putty knife. Allow to dry.

5. Scrape down lumpy bits with putty knife. Apply second coat with wider (6″-10″) knife. “Feather” it out, meaning there’s more covering the crack, but you’re angling the blade to scrape down outer areas.

6. Let dry. Sand with fine grit drywall sponge. If it looks funky, it may need more compound. If not, you’re ready to prime and paint.

7. Make sure you use primer that’s for drywall or bare plaster.

DIY Network

Categories

The Pumpkin House

The Pumpkin House published on 2 Comments on The Pumpkin House

pumpkin.jpg

I discovered this holiday appropriate house while cruising around Offbeat Homes. It’s set on 15 acres in Vermont and was built in 1997. Reading about the construction, I felt a bit guilty about ever complaining about my own renovations….“We were camping with a 1 1/2 year old not yet potty trained with cold weather coming fast. There were several 28 degree nights that month.” Gosh, I’ve had it so kushy, with my heating and luxury porta potty.

Sphere Cottage

DIY Energy Audit

DIY Energy Audit published on

es_logo.gif

Winter is coming! Ok, maybe not. But just in case, go ahead and check out the Energy Star website for some helpful tips on properly sealing up your home.

The site gives advice on insulation and heating, ducts and appliances. But here’s the fun part…you can do your own energy audit. You’ll need 12 months of utility bills, but once you put in a few hours finding those (I know I’m not the only one who doesn’t file), the quizzie itself takes about 5-10 minutes.

If you want to call in a pro for the audit, they list partners.

Related: Get tax credits for efficiency!

Build Your Own Sustainable Home!

Build Your Own Sustainable Home! published on 3 Comments on Build Your Own Sustainable Home!

earthship.jpg

Dream Green Homes is fabulous site for anyone doing research on building their own green home. The site is laid out so even an A.D.D. person like myself can find their way around. It’s broken down into styles, materials and functions. House plans can be purchased in the store. I want the packaged earthship.

Kelly Hart, the site’s host, is also the guy behind Green Home Building. Very similar subject matter. Loads of info. Here, you can sign up for training programs and buy informative books.

Call me a cynical New Yorker, but it looks like these folks drank too much kool aid. I’m not used to seeing shiny happy people. I just wanna say….if they’re affiliated with some kind of cult, I am not aware of it.

DIY: A Green Roof Grows In Brooklyn

DIY: A Green Roof Grows In Brooklyn published on 8 Comments on DIY: A Green Roof Grows In Brooklyn

gr2.jpg

I found Yeshwant’s “DIY Green Roof” post on the Brownstoner forum and asked if he would be kind enough to give me some info to pass along to my ECO/DIY readers. Well, he went above and beyond my expectations! Thank you, Yeshwant!

gr1.jpg

Here are our reasons for wanting a green roof:

We bought an 1840s Federal brick rowhouse in Red Hook three years ago. Our top floor bedroom, with an uninsulated tar flat roof over it, sizzled in the summer heat. Finding a way to cool it was the main incentive to want to green the rooftop.

I also liked that green roofs prevent rapid heating and cooling of the roof membrane and are therefore supposed to more than double its life. The growth media and plants are supposed to help insulate the roof in the winter, which we hope will warm the usually chilly upper floor.

Red Hook is a flood zone and the storm drains often fail to carry away rainwater, especially during heavy summer storms. Many homes have storm water backing up into the drains. So, the mitigation of storm water volume could only help the community.

On summer mornings, we’ve also noticed that butterflies and bees seem to like sedum flowers. As do we.

Here is the process: Continue reading DIY: A Green Roof Grows In Brooklyn

Women’s Power Tools

Women’s Power Tools published on

I try to keep my posts positive and I don’t want to sound like a catty bitch, but…I don’t get it! Sure the tools look pretty, but if you want to use a tool, why can’t you use real, macho tools? I mean, I have pretty small hands and I don’t need girlie tools. It just seems gimmicky to me.

consultant_party.jpg

Tom Boy Tools has tool parties, much like your mom’s Tupperware parties. They are dedicated to empowering women. Yeah, you look real empowered with that pink hammer in your hand! Ok, I’m not that evil. The pink is actually a positive thing. $3 from each “pink edition” sale will go to the Susan G Komen Breast Cancer Foundation.

company_photo.jpg

Barbara K‘s “true desire is to inspire women to become more self reliant and confident in their own abilities.” Really? I thought it was to become the Martha Stewart of home improvement. Barbara was a general contractor in NYC who thought tools for men were intimidating for women to use. Yeah, watch you don’t smear your mascara, honey.

MEOW!

Consumer Reports

DIY: Sink Vanity

DIY: Sink Vanity published on

diyvan.jpg

Cutting hole with jigsaw

This isn’t a very difficult project and hey kids, it can be fun and creative too!

I disagree with HGTV when they say pick out the sink first. I think it’s more difficult to find an antique piece of furniture. Soo, I suggest you find the perfect piece first. Height should be around 32 inches, but you can make it higher or lower (if it has legs). Large dressers and sideboards work well for double vanities.Continue reading DIY: Sink Vanity

Remodeling Parties

Remodeling Parties published on 2 Comments on Remodeling Parties

5201269_ab45c2ec68.jpg

Saw this on the Real Estate Journal via Bob Villa’s website.

We tried this with our first home. We didn’t have parties so much as barter with other diy renovators. It worked out better for some than others because of varying skill levels. In the end, we opted out of the “renovator’s community” because we felt we were getting the fuzzy end of the lollypop.

We did the “party” circuit thing too, but in the long run, even though it’s more fun, it probably took longer showing people what to do rather than just doing it ourselves.

A word of caution: You might want to be selective with whom you choose to work on your house. The RE Journal article sites injuries, backwards dry wall and contractors called in to fix the damage helping friends have caused.

Categories

DIY: Winterizing Your Home

DIY: Winterizing Your Home published on

house-leaks.jpg

It’s still pretty warm out, but it’s always good to start early. Here’s our list of ways to keep your home well insulated and energy efficient for the cold weather.

1. Take your window A/C units out. If you must keep them in, put a cover on them.

2. Caulk or insulate any drafty holes around windows and doors.

3. Make sure all heating/cooling ducts are sealed.

4. Don’t forget to close your fireplace flue.

5. If you have an attic, that should be insulated. You should even put insulation on the hatch.

6. Check for drafts around vents and faucets. Put insulation behind all exterior wall switch plates (they sell “special” stuff for this).

7. If you have antique windows, you can get historic storm windows. There’s nothing historic about them, but they are nearly invisible. We went with Allied Storm Windows.

8. Insulate exposed pipes and water heater.

9. Don’t forget to turn off your outside hose/faucet. It can freeze and pipes will burst!

10. Turn on your heat before it gets too cold so you know it’s working properly. You don’t want any surprises the first time the temperature really drops.

Energy Star

Recycled Home: Shipping Container

Recycled Home: Shipping Container published on 2 Comments on Recycled Home: Shipping Container

With shipping containers piling up because we import more than we export, some architects have come up  wonderful uses for them.

Adam Kalkin, who admits he has a “fascination with junk” is one artist/architect who specializes in shipping container chic. His homes start at $99,000 and are not only beautiful, but can provide extraordinary shelter for disaster relief.

Architecture and Hygiene 
CNN Interview: Adam Kalkin 

DIY: Repainting Cabinets

DIY: Repainting Cabinets published on 6 Comments on DIY: Repainting Cabinets

cabef.jpg

Home Depot Special

cabaft.jpg

New Life: Faux Antiqued Look

No, No, No, You don’t need to pay $20,000 for new cabinets! Not even $2000. Do you have real wood cabinets? Or even cool metal one? If not, you can probably pick up someone’s throwaways on Craigs.

Tools:

  • Palm Sander
  • Paint Brushes
  • Small Rollers (foam is good)
  • Paint Sprayer: cool, but not necessary
  • Drill
  • Sawhorse

Materials:

  • Lots of Sandpaper 120-180 grit
  • Bin Shellac Based Primer or Other Zinsser Primer
  • Gloss Paint (easier to clean than Semi or Eggshell)
  • Wood putty

Continue reading DIY: Repainting Cabinets

DIY: Grouting Tile

DIY: Grouting Tile published on

grout.jpg


Tools:

Rubber Grout Float
Grout Sponge
Bucket
Mixing Trowel
Grout Saw
Vacuum
Rubber Gloves

1. First you’ll have to clean up that big mess you made yesterday. Grab a vacuum and a bucket of warm water. With the grout saw, remove any areas of mortar in the seams that are too high to accept grout. Vacuum all dust, wipe down mortar on tiles using the grout sponge.

2. Mix grout. We learned about slaking yesterday, so you know what time it is. Enjoy.

3. Throw a glob of grout on the floor and work it into joints at an angle. The key is to fill the whole joint, not just the surface.

4. Wipe up excess grout off tile with the clean edge of the float.

5. For edges and corners, you may need a margin tool, but fingers also work fine.

6. You’ll want to allow about 15 minutes for grout to set before you start to wipe the tiles down with sponge. Think about this as you’re grouting. Don’t do the whole floor at once so it dries and makes it more difficult to clean.

7. Cleaning is hell. You’ll need to replace water in bucket several times. Be careful where you dump dirty water as it can clog sewer lines. Just keep wiping and drying, trying not to drag the grout out of the seams. You only want to clean the tile, not the grout.

8. Wait 24 hours, then seal.

DIY: How To Tile Floors

DIY: How To Tile Floors published on

tiling.jpg

“Extreme How To”

Tools:

Utility Knife
Notched Trowel (See mortar bag for correct notch size.)
Mixing Trowel
Tile Cutter (You can rent one.)
Level
Rubber Mallet
Floor Scraper
Chalk Line
Framing Square
Drill
Bucket
Vacuum

Materials

Wonderboard or Mesh
Thinset Mortar
Grout
Spacers
Screws
Tiles + 5-10% extra for screw ups

Continue reading DIY: How To Tile Floors

DIY: Repointing Brick

DIY: Repointing Brick published on 6 Comments on DIY: Repointing Brick

point1.jpg

Tools:
4” or 6” Trowel
Jointer
Tuck Pointer (Joint Filler)
Old Screwdriver
Bucket or mixing basin or wheelbarrow
Spritzer / mister or mortar brush (Or old but clean paint brush)
Mortar hoe or heavy duty drill with mixing paddle

Materials
Mortar – Type N, Type S or from scratch (Sand, Hydrated Lime and Cement)
Clean water

Safety
Rubber gloves
Glasses/goggles
Respirator

point2.jpg

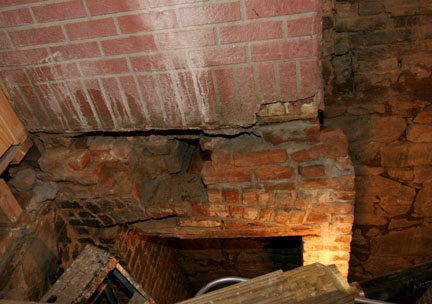
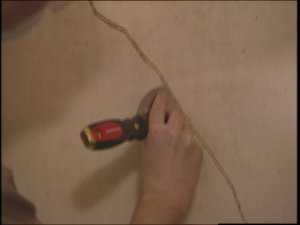
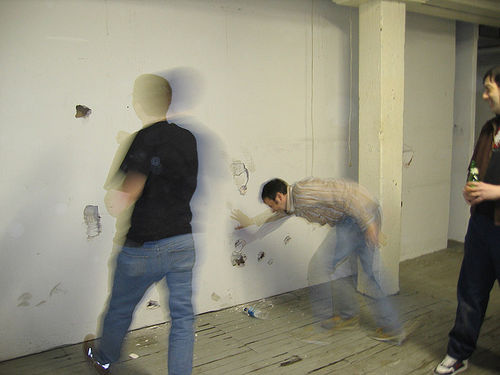
If your basement foundation looks like this, you shouldn’t attempt it yourself if it’s your first time. This is serious damage and yes, it supports the house. Call a pro. Yup, it’s our house.

Steps

1. Remove loose mortar from joints to a depth of 3/8”. This can be done with a raking tool (special tool with two wheels and a point that can be set to the depth you want to remove the mortar), an angle grinder with a diamond blade (quick but very messy) or just an old screwdriver. The idea is to remove enough mortar so the new mortar will stick but not so much that you end up rebuilding the wall. The new mortar will hold the original mortar in place so don’t sweat it that the old mortar is a little soft – unless it is just sand and it is flowing out.

2. Clean out raked joints using a brush, whisk broom or vacuum. The area you prepare will depend on your access, your experience, the atmospheric conditions etc…Damp down the joints and brick by misting using the spritzer, spraying with a wet brush or using a hose with the nozzle set on mist.

3. Mix the mortar – unless you are really going for volume and have gained a little experience mix by hand using a shovel or hoe or even with the trowel if it is a small area. It is easier just to use a bag mix – if you can use Type N (1 part cement, 1 part lime, 6 parts sand) the lime is more workable and will allow the joint to flex over time. Type S (1 part cement, 3 parts sand) is stronger and more rigid and should only be used for concrete block or brick rather than clay brick. You can buy the sand, cement and lime loose if you are buying large quantities and want the extra headache. Add the water a little at a time and mix well until you have a wetter consistency than you will use– allow the mortar to slake (start setting up) – it should stiffen but when you work it will loosen up. This is where practice and experience comes in with gauging the amount of water required. If you mix it too wet, add a little mortar to stiffen the mix.

4. Place a scrap piece of plywood below the area you are pointing to catch the mortar that will fall. Pick some mortar up from the basin or bucket with the reverse side of the trowel (so the handle is down and out of your way) and place the long edge of the blade to the horizontal joint. Use the tuck pointer to shove the mortar into the joint – working you way along the joint while pushing the mortar in to fill up the joint. If the mix is too stiff the mortar will be hard to compact into the joint, if it is too wet it will sag out of the joint – this may be due to the mortar not having slaked enough so you may need to give it more time. Fill horizontal joints and then work on the vertical joints – but try to work a small area at a time so that the mortar is still workable in the horizontal joints while you fill the vertical.

5. As time passes the mortar will lose workability when it reaches a certain point junk it and start again. Mortar will fall – as long as it doesn’t get contaminated with dust or dirt you can pick it up and mix it back in with the rest of the mortar. Adding water as you go will weaken the mortar and cause it to crack. After a few minutes you should go back over the joints to tool them using the jointer or the tuck pointer – this helps compact the mortar and you can strike a different profile (concave, raked flat etc…)

6. The trick is to get a rhythm going between raking the joints, mixing, slaking and pointing so that you are not wasting time between steps.

7. If it’s dry and/or hot, I spritz down the joints after they set up to stop them drying out – not too much that the cement or lime is washed out, however.

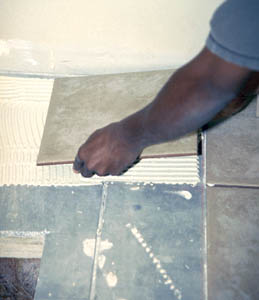
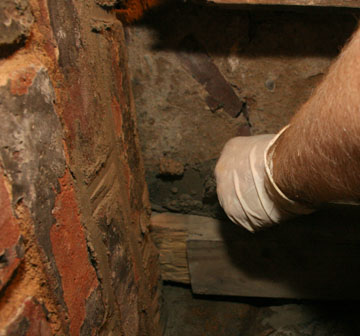
8. For those hard to reach areas – especially if it is not a cosmetic job – I use my hands to fill the joints and strike the joint with my finger – this is where the rubber or surgical gloves pay off.

Some Links:
Marshall Town
DIY Network
Gardening Data

Salvaged Bath

Salvaged Bath published on 7 Comments on Salvaged Bath

Design by Craig and Ebay

bathtub.jpg

bathdoor.jpg

After restoring 3 floors of our house, there was no money left for the 4th level. The bathroom had to be put in from scratch and we didn’t have time to DIY it. Not that we would’ve spent a cent more on materials if we had it, but we were REALLY on the lookout for bargains this time.

How do you think we did? Is this high or low compared to others? Our big ticket item was the shower enclosure.

Clawfoot Tub: Free. Craigslist
Sink Vanity: $ 40. Craigslist
Glass Counter/Backsplash: $ 50. Craigslist
Sconces: $ 220. Ebay
Stained Glass: $ 250. Ebay
Copper Sink: $ 110. Ebay (Mexicopper)
Vessel Faucet: $ 92. Ebay
Medicine Cabinet: $ 50. Water St Market, New Paltz
Octagon Floor Tiles: $ 250. Bergen Tile
Mariner Toilet: $ 180. Lowes
Shower Enclosure $ 660. Clawfoot Supply
Hunter Exhaust Fan: $ 98. Lowes
Towel/Toilet Holders: $ 16. Ikea
Door: $ 20. Eddie’s Salvage (Greene and Grand, Brooklyn)
Doorknob: Free Came with house

TOTAL: $ 2036

PS:We still need molding, but we can probably come up with enough scrap from our basement.

Primary Sidebar