
The following is a simple way to repair hairline cracks. If your walls are badly damaged or need to be smoothed out completely, see the link below.
Tools and Materials:
Utility knife
Putty knives (3″-10″)
Spray bottle
Joint Compound
Mesh tape (if needed)
Structolite (if needed)
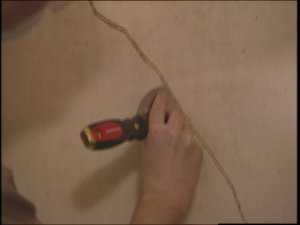
1. You have to make it worse before it gets better. Take your knife (or similar tool) and dig out the crack. You have to widen it enough (about 1/8″) so the compound will adhere to the interior wall, not just cover it like a band aid.
2. Get rid of loose dust with a brush or vacuum. Spray it down to dampen, not soak. Wipe the wall down. You only want the crack to be wet.
3. If there were no disasters, you’re ready for the joint compound. If the wall started crumbling alittle more than you wanted, you should fill the gaps with Structolite or use mesh tape before applying compound.
4. Fill the crevice with the compound. Smooth the surface with putty knife. Allow to dry.
5. Scrape down lumpy bits with putty knife. Apply second coat with wider (6″-10″) knife. “Feather” it out, meaning there’s more covering the crack, but you’re angling the blade to scrape down outer areas.
6. Let dry. Sand with fine grit drywall sponge. If it looks funky, it may need more compound. If not, you’re ready to prime and paint.
7. Make sure you use primer that’s for drywall or bare plaster.
2 Comments
[…] been looking at those cracks in the ceiling all year? Get off your arse, chase them out and patch them up. The plaster fairy god mother ain’t coming to help out any time […]
I don’t even know how I ended up here, but I thought this post was good.
I don’t know who you are but certainly you’re going to a
famous blogger if you are not already 😉 Cheers!