
Tools:
Utility Knife
Notched Trowel (See mortar bag for correct notch size.)
Mixing Trowel
Tile Cutter (You can rent one.)
Level
Rubber Mallet
Floor Scraper
Chalk Line
Framing Square
Drill
Bucket
Vacuum
Materials
Wonderboard or Mesh
Thinset Mortar
Grout
Spacers
Screws
Tiles + 5-10% extra for screw ups
1. Let’s assume you’ve removed all fixtures and cabinets and are starting with plywood. We do not recommend tiling over tile! Remove all baseboard and trim that comes down to the floor. If it’s original molding and you think you might damage it, the option is to tile up to it and put quarter round to cover cuts. You will lose some height off the molding, but it’s better than destroying all of your 100 year old molding. Don’t forget to think about doors you may have to cut down if the floor is higher.
2. Vacuum, fill open drains and open pipes with rags or plastic bags. Oh yes, you DO have to remove the toilet! Since we haven’t covered that yet, refer to this site for help:
“Do It Yourself”
3. Wonderboard is easier to work with than mesh. (Anyone disagree?) You can cut it with a utility knife, just like sheetrock, but it’s much more difficult to do. Use the framing square to keep a straight line and score, score, score again. Then snap. Oh yeah, and measure twice, cut once. Tip: You’re better off with a carbide blade cutter.
4. Stagger joints so they don’t line up with plywood joints. Make sure to sink screws. Vacuum again. If the floor is smooth and level (no screw heads, no broken wonderboard sticking up) your underlayment is done.
5. Do a dry run. Layout tiles. Take them up.
6. Snap a chalkline (90%) from center of most visible wall to center of opposite wall. Do same from center of perpendicular wall. Layout tile again, along lines. This site has diagrams and more info should the tile not look right (which they won’t):
“Home Time”
7. We like to do our cuts first. By now, you’ve looked at that better site (Why are you back?) and you’ll know which tiles to cut. Easiest way is to line up tile on top of closest to wall and draw the line where bottom one ends. Get it? Chances are the walls are not square, so it’s a good idea to measure each one. *Wear goggles and watch your fingers when cutting !
8. Mix your thinset by following manufacturer’s instructions. The consistency should be that of peanut butter. Smooth, not chunky. A mixing attachment on your drill is MUCH easier than using a trowel. You’ll need to let it slake for 5-10 minutes. Go grab a cup of coffee.
9. First, fill your wonderboard seams with thinset. Ideally, you should let it dry and seal it, but who has time?
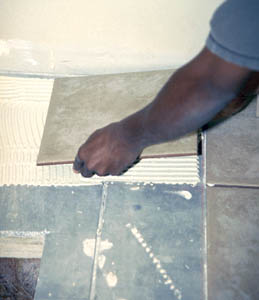
10. Scoop a glob of thinset onto the floor with mixing trowel. Spread evenly at chalk line with straight edge of notched trowel. Use notched end to make even swirls. Make sure the entire area is covered evenly. Not too much and not too little. You want to set the tile on your chalk line, so don’t cover that up with the mortar. Work in sections!
11. Squish the tile around a bit and apply pressure, but not so much that it squeezes out all the mortar. Put your spacers in so you can get them out easily.
12. Level the tiles as you go along. You can a homemade tool such as a piece of wood or sheet rock with handle. We like to use a long level to push down on tiles while checking the the actual level. The rubber mallet comes in handy during this process.
13. Clean up excess mortar that has squeezed through the spaces. Any thin tool will work. Probably not the correct way to do things, but we grab the mortar with the spacers as we remove them. It’s messy, is all.
14. Oh, here’s where we tell you not to tile yourself into a corner. Hope it’s not too late or you’ll be stuck there for awhile.
15. When you get to walls and corners, you may need to “butter” the back of each individual tile.
16. Wait 24 hours before walking on it or grouting. If you’re using stone tile, it may need to be sealed before grouting.
17. Tomorrow: The Grout Post