Skip to content

Building Stairs

Building Stairs published on

After six years of procrastination, we finally replaced our dangerous basement steps that were about to collapse.

Pre-cut stair stringers can be purchased in many lumber shops. This video kicks off after hubby measured and cut his own stringers. Project is for an intermediate skill level DIYer. Beginners can do it if they’re good at math. I suck at math, therefore, I would not be able to install stairs.

DIY: Concrete Slab Form

DIY: Concrete Slab Form published on

IMG_6301

This may be boring for you more designy/less handy folks, but it’s what we’re working on at the moment. In this case, we happen to be creating the slab to use as the bottom step of the basement stairs.

Check out this video if you want to learn how to set up the form for a concrete slab pour. If you’re working on an entire floor, you would do something like this on a larger scale. The room can be broken down into smaller slabs and joints can be filled in later.

Tackling the Basement

Tackling the Basement published on 3 Comments on Tackling the Basement

IMG_6281

Ugh. Just when we thought we were near the end of our renovation we realize that the basement will be a bigger project than we had anticipated. Why can’t we just leave it a dusty, crumbling mess? Well first of all, basements are the foundations of homes and the stone walls need to be maintained for both structure and water blockage.

The main reason we want a nicely sealed-and-easy-to-clean unfinished basement is the cats. The plan is to make a cat hangout down there so they stop messing up our garden level.

IMG_6283

On the to do list is….

1. Rebuild the stairs that hubby ripped down over 2 weeks ago. We are currently climbing down the hatch out front.

2. Repoint stone wall and bricks.

3. Pour concrete for solid, level floor. What is down there is about an inch of uneven concrete on top of soil.

4. Move boiler against wall to create more space. Yay, another few thousand for a licensed plumber! Oh, did I mention we’re replacing boiler and water heater while we’re at it?

5. Build wall separating new boiler from cats.

6. Sump pump. We will clean the area by hosing it down.

7. Exhaust fan.

8. Seal walls and epoxy floor.

9. More lights. Deal with holes in ceiling cats can climb into.

That’s about it. A lot of work for an unfinished space that nobody is gonna see.

IMG_6286

Stairs in Tight Spaces

Stairs in Tight Spaces published on 2 Comments on Stairs in Tight Spaces

We are preparing for our next home improvement project: the basement. The plan is to clean it up and seal it so we can let the cats have their own playroom down there. Before any work gets done, the first thing we need to address are those stairs that have been dangerously hanging by one nail for the entire 6 years we’ve lived here.

Basic basement steps are easy enough to install. Prefab stringers can be purchased to make life easier. You can even find full staircase kits ready to go. For those, you would only need to measure ground floor to top landing and make sure it’s all level, plum and well supported.

Of course it’s never that simple for us. For some reason, we have the waste line running alongside our basement stairs. That’s why someone decided to build an unevenly supported staircase by moving right stringer in by oh, about six inches. Can’t figure out why they thought this would work, but then again we don’t get a lot of their “fixes” in this house.

So, what do you do when trying to install a stairway in a narrow area with a sewage pipe and crumbly plaster walls on either side? And no, moving the pipe is not something we want to do.

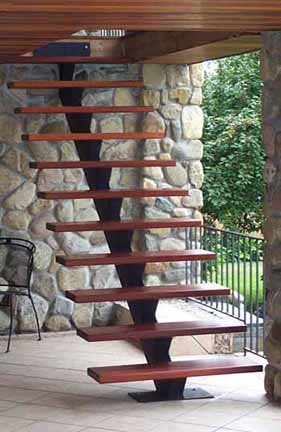
The floating staircase is the idea we’re leaning towards at the moment. The straight stairway above has a metal mono stringer running down the middle instead of the usual twin supports. This shouldn’t interfere with the weirdness on the sides and the one tread that hits the pipe can be cut shorter.

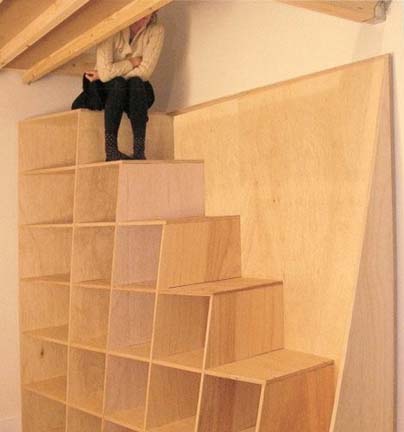
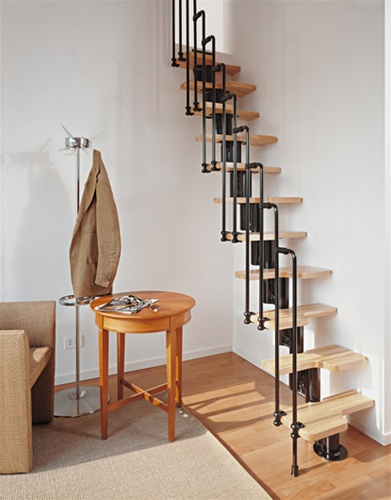
Here’s a narrow staircase. Kind of weird and not for us. But it beats a rope or fireman’s pole if you don’t have space.

Of course the worst part about this is the cost. A basic Home Depot set of DIY basement stairs should cost around a couple of hundred bucks. These fancy schmancy kits will run closer to two grand. I haven’t researched thoroughly yet, but I’m hoping we can just buy that mono stringer and cut our own treads. It will save some dough.

Kits:

Fast Stairs

Iron Shop

Mylen Stairs

Stairway Shop

This Hits Home

This Hits Home published on

The death count for Hurricane Irene is now up to 40. We joked that it was non-event here in the boroughs, but looking at the damage she caused elsewhere, we should thank our lucky stars it wasn’t worse.

This NY Times photo struck a chord. This poor woman was in the middle of restoring her 200+ year old house. You know she loved that house because she took the time to scrap the paint and brighten it up instead of slapping on some siding. I can sympathize with her loss because I know how I’d feel if I put in hours of work for nothing.

People’s homes and businesses are damaged all the time in natural disasters. As long as everyone survives (pets included), it’s just a building. And possessions. Hopefully, insurance covers enough so that people don’t end up with nothing. But you can’t replace the intangibles. The memories. The time spent working to make it yours.

Memories fade and time passes no matter what. Money comes back. It must hurt to have them stolen in a single day though.

Diamond in the Rough, Millbrook

Diamond in the Rough, Millbrook published on 8 Comments on Diamond in the Rough, Millbrook

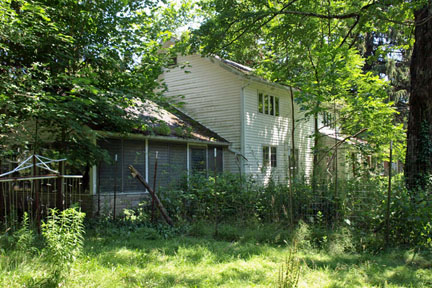
This had me at hello. I was perusing the Dutchess County MLS yesterday, just because, when I found this beauty. Call it what you will: Diamond in the Rough, Handy Man Special, Fixer Upper. But I’m in love.

The abandoned home sits on nearly 2 acres in chichi Millbrook. It was built in 1976. Yeah, 1976! Doesn’t it look like an old farm house? I know!

There were other houses up in that neck of the woods that have been better taken care of, but I’m always attracted to the underdog. Is there something wrong with me? I mean, I look at it and want to save it. I look at it and see an awesome friggin bargain. But then I wonder if my elevator doesn’t go to the top floor.

So, here’s the thing…For $159k (Oh yeah, did I mention that?) you’re not buying the house as much as that incredible property. Have a look at the photos below so you know what I’m talking about. Huh? Huh?

Seriously, I’m up there all next week and I’m gonna have myself a look at it. Wanna come with? Contact me. I might need help fighting off the family of raccoons living in the bathroom. (Just kidding! Maybe.)


2 Years Ago in Renovations

2 Years Ago in Renovations published on

Flashback: July 27th, 2009. The Reclaimed Home post of the day was “Garden Apartment Now Livable!”. So, where do we stand now in the world of home renovations? Finished?

Hardly. It’s funny that I decided to look up past posts on today of all days, when I’m taking my dogs and my visiting mom and fleeing the scene for a couple of days. The window guys are on week 3 of installation and the garden and parlor apartments are once again, works in progress.

So, how did it all work out with that to-do list I posted 2 years ago?

1. Work around windows. Still no sills. But at least the windows will be new.

2. Get shutters in. Oh yeah. They will be coming out and going back in. Again…windows.

3. Radiator covers. Radiator covers. Check!

4. Sink, counter top, backsplash. Mini Kitchen. Check. But we’ll be taking it out now that we have a full kitchen on the parlor floor.

5. Paint sink base. Yeah.

6. Finish molding. Yup.

7. Strip doors (ugh, more stripping). Ah, we just painted them white.

8. Clean up mantel. Um…

9. Re-do hearth (damn, forgot about that!). Later.

10. “Fancy paint” for trim and medallion. Painted medallion done. Still no light fixture.

Modernizing Raised Ranch Exteriors

Modernizing Raised Ranch Exteriors published on

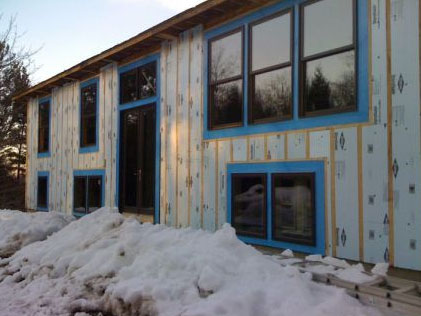
The problem with raised ranches is that they look dated. Those 1970’s-1980’s models are about as stylish as that old Flock of Seagulls haircut. The good news is there’s always a way to change the look of any house. The bad news? It’s hard on the pocketbook. The good news? It’s less expensive than buying a new/old dream home.

The house above is actually a renovated raised ranch. I’m no architect, but this completely modern look probably means lifting the roof. Forget the deck thang because it’s not compatible with most split levels. Just picture the upper story with all windows.

Instead of going with contemporary, how about stepping back in time? This raised ranch was built in the 1950’s but that doesn’t mean your 1980’s home can’t rock the mid-century look.

Howdy! How about “barn style”? Paint it red, slap a front deck on it and yee-haw, you’ve got yourself a rustic abode in the burbs.

No, this isn’t a raised ranch but it’s the closest image I could find to a stucco home. Stucco comes in any color, so you can have a pretty pink stucco ranch if your heart so desires.

Fine Homebuilding did an article on how to get rid of that raised ranch overhang. Think about it, without that, the house could take on any look you want. With some recycled brick, it can look like the house below.

I didn’t find any Victorian splanch photos, but with some wood siding, a porch and detailed trim, you got yourself a Painted Lady Victorian!

Click on the images to get more info on each house.

Updating Raised Ranches. Part I

Renovating on a Tight Budget

Renovating on a Tight Budget published on 1 Comment on Renovating on a Tight Budget

If your renovation is costing more than you paid for your house, something is wrong. You shouldn’t have to sell your first born to update a home. Sure, there are certain large ticket items you wouldn’t want to skimp on….roof, windows, facade, boiler, structural. But semi-skilled work? Come on.

As you know, I’m a big advocate for DIY. If you put in the sweat equity, you can be save yourself in the vicinity of $40k. I came up with that estimate by comparing DIY input to that of an unskilled day laborer at $125 per day over the course of a year. My own skills are superior to a guy you pick up at Home Depot, so my own estimate is probably double that. Obviously you wouldn’t quit your $200k per year job to do it, but as a freelancer earning bupkas, I was able to put in the time. My husband who put in a lot less time because he actually has a full time job and does earn something, probably saved us even more while only working on the house on weekends. That’s because he has mad skills.

Before I go into materials, just a few thoughts on other ways to save on labor. Painting and demolition parties, barters, hiring apprentices to high end contractors and of course picking up day laborers.

Materials range from free to high end. Since this has the words “tight budget” in the post title, guess where I’m going with this?

FREE

It would be a fun experiment to try to do an entire renovation free of cost. But nothing is ever free. It would take tons of time and probably cost more in fuel than trying to buy locally. But here goes…..

1. Craigs List. Go directly to the “free” section. You may find anything from sheetrock scraps to clawfoot tubs. People measure wrong, decide to use something else or may want to recycle what they are ripping out.

2. Freecyle.org Sign up for the group to gain access to a nationwide network of recycled goodies. IMO, it sounds a whole lot better than it is. When I signed up, I couldn’t believe the audacity of some people. One of the requests I saw was for a minivan for someone with 8 kids. Hello, maybe you should stop having kids if you can’t afford a van! But I digress. You can post your own needs, search for what’s out there and offer up what you no longer want.

3. Dumpster Diving. Oh yeah! I’m talking dumpsters parked outside of a renovation, obviously. Better still, find the fixer uppers that have just closed, contact contractors and demolition guys to see if they’ll give you the head’s up. No, they won’t be happy, but one or two of them might not think it’s great to stick everything in the landfill. You know, those sensitive contractors.

Almost Free

1. Craigslist. This time search “materials”.

2. ReStores. Located throughout the US and Canada. Run by Habitat for Humanity, these shops take donations from the public and sell the items at a fraction of the cost. They have everything including the kitchen sink. Paints, cabinets, light fixtures, furniture….

3. Build it Green. I saw a coffin in here once. If you live in NYC, this place is just as good as any Restore since the closest ReStore is in Mt. Vernon. BIG is a huuuuge warehouse in Queens. They have new and used studs, wiring, cabinets, doors, windows, appliances and more. Do keep in mind that items like plywood, sheetrock and studs go quickly as these are basic to any renovation.

4. Salvage! There are antique architectural salvage yards all over the planet. Although you might sometimes find a bargain at Olde Good Things or Demolition Depot, they are not for the shallow pocketed. My two local faves: Eddie Hibbert in Clinton Hill and Vaccaro’s in Gowanus. I’m talking antique french doors for 20 bucks and marble mantels for less than $400. *They may need work.

5. Overstock and Closeouts. Every now and then, manufacturers need to get rid of some clutter. There are samples, irregulars and dead stock taking up space. They don’t always post it online, but I’ll give you a for instance. I once found the mother load of concrete tiles, countertops and sinks on Craigslist. Get Real Surfaces in Poughkeepsie was having a sale to get rid of dead inventory. I made out with enormous boxes of tile for $10 per box. They were probably worth about $20 per square foot.

6. Ebay. Did you know that you can buy faucets, toilets and tools on Ebay? Yep, it’s all there!

7. Overstock.com. Sometimes good for faucets, shower and light fixtures, tiles…it kind of depends on what they have that week. Hit or miss.

Upscale. Low Budget

Green Demolitions. Buy what the millionaires got tired of looking at. Top shelf appliances (think Viking, Sub Zero) and cabinets for a ton less than what you would pay new. These aren’t completely inexpensive, but it’s a good deal for what it is!

PS: Side effects may include saving the planet while saving your pocketbook.

The House as Art

The House as Art published on

A psychic once told me that I was going to become an interior designer. She said I see the way the fabric in a curtain hangs and I look at that as art. I was like “No, you’re nuts. I’m a photographer.” Well, about 25 years later, I realized that she wasn’t so far off.

There are two kinds of people in life. Those who want a completely finished home that just needs furnishing and those who see a fixer upper and get excited over the possibilities.

Up until a few years ago, I thought everyone wanted to have control over their own renovations. Sure, it takes up your entire life for a few years, but you forget all about it once it’s over. I wouldn’t want a nanny raising my (non-existent) baby. Why would I hand my house over to someone else?

Someone recently asked me “Why”? What is it that makes me walk into a chippy paint, crumbling, derelict home and fall in love?

Hmm.

Each home is a history lesson. Much like the Tenement Museum is one of the most fascinating places to me, a home forgotten in time takes me back to that era. These home are over 100 years old. Perhaps it’s my mission in life to preserve the past before some eejit rips everything out and installs sheetrock, engineered flooring and Home Depot molding. (I just puked in my mouth thinking about that.)

It’s a blank canvas. I can’t remember a time when I wasn’t a “creative”. I always see things and want to change them. I still have difficulty comprehending that not everyone is right brained. Is it like being psychic, where you have to develop that skill? If so, I should be working on my left brain capabilities because I’m sorely lacking in those areas.

Anyway, blank canvas. So, I walk into a house and I see the finished product. It’s kind of like being a photographer. I envision the end result and work backwards from there on how to make it happen.

“But HOW? HOW do you just walk in and envision everything finished?”

I don’t think I’m creative genius who comes up with completely original ideas. My memory sucks, but I must retain visuals from homes, museums and magazines that my brain recycles for each potential project. Well, there ya go! That’s something everyone could do. Start visiting house museums, go on house tours, travel, save images (the 2011 version of magazine clippings).

Adding, not taking away. Lookit. Say you buy a place that has been renovated, but it’s not your taste. You choose this place because the house that needs too much work scares you. But now you’re stuck ripping out that pink granite countertop and those hollow Home Depot composite doors. And what are you going to find underneath it all? How do you know the previous owner didn’t cover up rotting wood or leaky pipes? You don’t. And you’re adding NEW materials to the landfills.

With a fixer upper, you can look at the bones of the place. The original lines of the building. The intricate details and plaster curves that are no longer produced. Try to salvage that stuff! Something can’t be saved? Yeah, it goes in the landfill, but it was made 100 years ago, not 10.

Any questions??

Home Buying 101

Home Buying 101 published on 2 Comments on Home Buying 101

Are you still wet behind the ears when it comes to home buying? You’re not alone. Everybody has a first time. Just sit back and relax, baby. Reclaimed Home will make it alright.

Seriously, it’s a big f*in’ deal. That’s alotta dough you’re forking over. You SHOULD have questions. So, what steps do you need to take? How do you go about it?

1. The first thing is to go over your budget. Pretty obvious, but it’s incredible how many people start looking before they have their finances worked out. How much do you have for a down payment? Don’t forget that closing costs will be between $10k-$20k.

Talk to a mortgage broker or bank to see how much they will lend. Then take a good look at your present and future and make sure you can pay that monthly amount. Do you need rental income? How much? Size matters in this instance. Bigger rental units equal more income.

2. Location, Location, Location! True dat. The one thing you cannot change. Unless you want to move the house and that’s kinda a big deal. You can redo just about anything inside the house. Maybe even add an extension if it’s a tad small for your needs. But you have to love where you live. And please do yourself a favor and never put the house before the neighborhood. You can have your dream house, but if you hate life outside of those four walls, then what?

3. It’s an investment. Yes, you need a place to live, but that doesn’t mean you should make unwise decisions. Just don’t get ripped off because you fall in love with some bathroom tiles or a zip code. (Yeah, I know I mentioned location is key, but it doesn’t mean by any means necessary). What’s a good investment? A run down place in a great neighborhood. A fabulous dream home in an up and coming neighborhood (that you also happen to love). What’s a bad investment? The best house on a shitty street 10 blocks from an awful train line.

4. To Renovate or Not. Hmm. Personally, I loves me some fixer uppers; however, it’s not for the faint of heart. BUT! If you don’t want to renovate, you kind of can’t be too fussy with what’s on offer or you’ll be looking forever. What are the chances that the seller has put in exactly what you desire? So, you’re either buying into someone else’s taste or you make it your own from scratch. Tweaking a finished home is great, but keep in mind that  it’s awfully wasteful to rip apart a $30k kitchen so you can make it your own.

Question is, do you have what it takes to live with a renovation? Are you hiring people or tackling it yourself? Do you want to be married to your house for the next few years? That means you’re a house wife. Oh, it’s all worth it in the end, but you need to realize what you’re getting yourself into first.

On the other hand…. and I can’t stress this enough….be careful when buying a “renovated” house. You do not know what is going on under those new floors and walls. Don’t want to scare you or anything, but not everyone repairs rotting joists or repoints structural brickwork before slapping something over it. If it looks like a quick, shoddy renovation, there’s a good chance something may be going on underneath. Not a rule of thumb, but we found crazy-sloppy work in 4 out of 4 of my houses. Just sayin’.

Well, that should be a starting point. Feel free to post questions if you have any. Now, go forth and look!

Craigslist Building Materials

Craigslist Building Materials published on 7 Comments on Craigslist Building Materials

Never underestimate the value of Craigslist when it comes to renovating your home. You can find anything from free studs to $1 Italian ceramic tile to reclaimed flooring at half the cost of outlets.

People often have leftover material from projects or they recycle the stuff they rip out. A short list of things I found on Craigs include…

1. Claw foot tub. Free
2. Glass mosaic tile counter and backsplash. $50
3. Finished walnut flooring for BR and hallway. $400
4. Like new cherry kitchen cabinets for entire kitchen. $500

How much does a marble kitchen countertop cost? $2000-$3000? $125 bucks for that 18×48 slab above. Yeah, you still have to cut it, but if you want a marble counter and it’s beyond your budget, this is one way to do it. I may actually give them a call as I’m looking for marble to use as window sills.

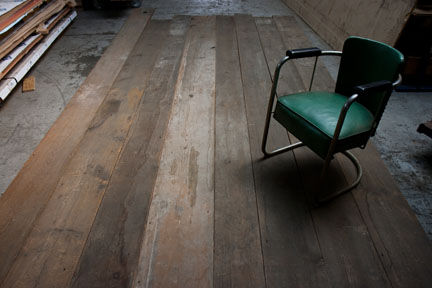
Reclaimed 1700’s pine wide plank flooring. No price and it looks to be a factory or lumber yard, so don’t know if it’s a bargain. Retailers charge $6 and up (way up) per square foot for this stuff. I think we paid around $10 many years ago, plus shipping.

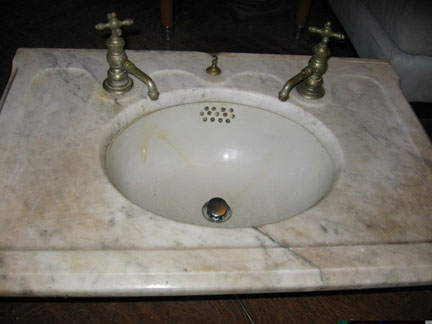
This antique sink top includes the faucets and undermount sink for $200. Is that a fabulous bargain? Eh. But it’s one stop shopping since you don’t have to go out and find the fittings for the counter. You can sit it on top of an old dresser or antique wrought iron sewing machine base, as I’ve done in the past.

Retailers will charge something like $.65-$2.00 per used brick, but you can always find someone giving ’em up for nothing. This pile of used bricks is located in Poughkeepsie, NY. There are 250-300 of them. Sometimes you have to travel a bit to get something for nothing, so make sure it’s a whole bunch of something!

Primary Sidebar