Skip to content

Weatherization Assistance Program

Weatherization Assistance Program published on 1 Comment on Weatherization Assistance Program

The WAP or Weatherization Assistance Program helps low income families reduce their energy consumption and bills. Mark your calendars for March 8th, kids, because Sustainable Flatbush will be hosting an event to provide information on this important program.

Here’s the deal:

WHAT:
How to Fix Your Home and Save on Energy Bills

WHERE:
Mt. Zion Church of God
203 East 37th Street (between Church Avenue and Linden Boulevard)
Brooklyn, NY

WHEN:
Tuesday, March 8th from 7-9pm

The workshop will cover heating systems, insulation, energy efficient appliances, water saving tips and a number of things you should already be doing.

If you’re abode isn’t 100% energy efficient, you can probably learn something from this. Plus, refreshments will be served.

DIY Classes at City Tech, Brooklyn

DIY Classes at City Tech, Brooklyn published on 3 Comments on DIY Classes at City Tech, Brooklyn

It’s that time of year again! City Tech is offering up their DIY classes. Learn everything you need to know about home repair so you can correct me when I pretend to know what I’m talking about here.

Hands-on Home Repair Workshops
Everything You Wanted To Know About Your Home (But Were Afraid to Ask)
Wed, 6 – 9 pm, 2/16 – 4/13  $50 per session
25 Chapel Street Room 106

Basic home repairs. How to fix a toilet, patch and plaster a wall, the basics of residential electricity, install a light fixture, install a lock, unclog a trap, spackle a wall and become your own favorite handyperson.

Weatherize – Caulk it up to Savings
February 16
Insulate, caulk, and weatherproof your house to keep the heat in. Low cost ways to save cold cash.

Homeowner ‘s Basic Tool Kit
February 23
Cut a board, level a shelf; install an anchor bolt in a hollow wall. This class will stock your toolkit with the most useful tools and give you hands-on tips for using them. Discover your inner handyperson and save on basic repairs.

Homeowner ‘s Guide to Basic Plumbing
March 2
Basic plumbing: How to fix a toilet, bleed a radiator, unclog a drain. Save on costly repairs that you can do yourself.

Lock Installation
March 9
Having a security complex? Install a deadbolt or mortise lock, update existing locks, and replace door knobs.

Plaster and Sheetrock Repair
March 16
Repair a crack, frame and tape, patch plaster, fill a deep hole or a nail hole. You can do it!

Everyday Electricity You Can Do Yourself
March 23
How to replace a fuse, change an outlet, install a fixture, test for power and splice a wire.

Installing Ceramic Tile for Floors and Walls
March 30
How to create a level surface, select floor tile, lay out a pattern and install like a pro.

Paint Like a Pro
April 6
A great paint job is method, not madness. This course teaches you how to prep the space, select the right tools, and apply paint like a professional. Please wear old clothes.

Blueprint Reading: The Grand Plan
April 13
Blueprints are diagrams that represent an interior space. They are the language that architects and contractors use to design and build. This course teaches you to understand electrical plumbing and construction symbols, read a floor plan, and even draft your own. Please bring a pencil, an eraser and a pad of tracing paper to the class.

Lights Made From Recycled Stuff

Lights Made From Recycled Stuff published on 3 Comments on Lights Made From Recycled Stuff

pop2_content_site.jpg

Soda Can Pull Tabs. Mauricio Affonso

il_570xn193721949.jpg

No wire hangers! They’re plastic. $ 425 from Aaron Brand Design

dd.jpg

Chair legs on fiberglass. Dana Depew

il_570xn191553890.jpg

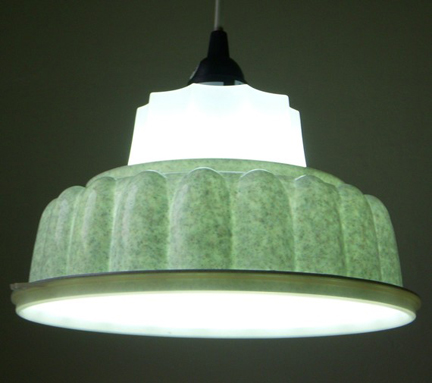
Tupperware Jello Mold. $35 from Boots n Guss

il_570xn176042863.jpg

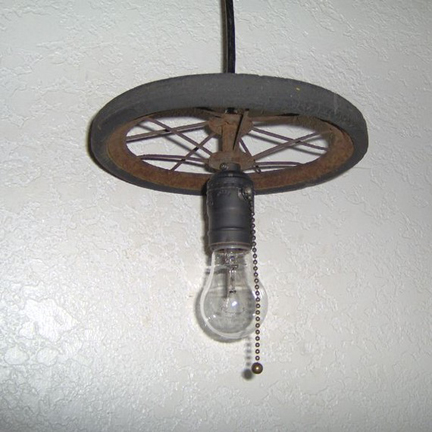
Tricycle Wheel. $35 from Washburn Art

Wanna Hear My To Do List?

Wanna Hear My To Do List? published on 2 Comments on Wanna Hear My To Do List?

Feb 20 (Day 51): To Do List

No? Tough. Now that we’re all moved back to Brooklyn and have the finances to seek help from a pro, I’m making lists, baby! We’ve been living out of tote boxes for 7 months now, ignoring the mess until Gifted is over on Thursday.

Anyway, here’s the to do list:

1. Hallway Privacy! Yes, we still share a communal hallway with the upstairs tenants. We took over the parlor floor with intention of having garden/parlor duplex. It will get done (this week!) but in the meantime, we’ve been making sure the coast is clear before running upstairs in our jammies. It’s pretty pathetic.

2. Closets! Oops, maybe I have too many clothes. And all I ever wear is a single pair of Levi’s. We need to change the laundry room closet shelving into a hanging clothes closet. There aren’t even doors on it at the moment. But oh, how luxurious it’s going to be! The laundry room is right outside our bedroom. Bed. Laundry. Closet. Perfect for the lazy person.

3. Molding. Our 6 peeing cats are still locked in one room because the hallway isn’t ready. We need to make all cat areas pee proof. That means finishing up the baseboard that we haven’t bothered installing in the 5 years we’ve owned the house. Baseboard + caulk=less pee seepage into floor boards.

4. Light fixtures. For the past 16 years we’ve been renovating one house or another. And for the past 16 years we’ve been living with those light bulb pig tails until a house is ready to sell. Well, I’m determined to enjoy this house! Fabulous light fixtures and all.

5. Basement. We had a kitty hang out in our first house in Park Slope. We didn’t lock them down there, but we made it a comfy area so they would want to stay. The food and litter… basement. We had sealed concrete walls and floor with drains so we could just hose it down. It was a dream to clean. The plan is to recreate that here in Bed Stuy.

Goodbye, Dream Home

Goodbye, Dream Home published on 2 Comments on Goodbye, Dream Home

2233370312_3fdd334b8d_o

In a few hours we’ll be closing on the sale of our Beacon house. Don’t get me wrong, I’m elated that I’ll have one less headache. You know the saying “The more you own, the more it owns you”. We’ll take weekends off instead of working on the house and we’ll buy toys for ourselves because we won’t be paying two mortgages. It’s all good!

I can’t help but feel a bit melancholic though. This was our dream house and it took us a long while to arrive at a place where we were able to afford our perfect house. We thought we would stay forever. We stayed for six years.

So, goodbye huge backyard. Goodbye spectacular antique woodwork. And stained glass. And awesome wrap around porch. So long, pocket doors. Turret.

It’s not you that we’re leaving, House. Don’t feel bad. As of today, you’ll get a fresh blast of love from someone new. If we could transplant you to Brooklyn, we would. But alas, it isn’t to be. We needed to be back in the city at this time.

We are fortunate enough to be living in another architectural dream of ours: The Brownstone.

But between you and I, House, Queen Anne Victorian trumps narrow brownstone living any day of the week.

I’ll miss you! 🙁

PS: I’m keeping the logo.

10 DIY Tools To Be Thankful For

10 DIY Tools To Be Thankful For published on

400

1. That razor blade holder thing for paint removal.
2. Cordless drill. Oh honey, I’ll never take you for granted.
3. Tape measure with marked fractions. Because I don’t know how to read it otherwise. Yup, there, I’ve said it.
4. Duct tape. You know why. When you can’t fix it….
5. Swiss Army Knife. Well, I don’t really use it around the house, but I carry it with me and it does come in handy at work.
6. Center punch. That little thing comes in handy!
7. Staple gun. Almost as versatile as duct tape.
8. Foam paint brushes. So environmentally unfriendly, yet so unbelievably convenient.
9. Metal snips. Because you can use them to trim bushes too.
10. Hammer. Of course, I wouldn’t forget you, my dear old friend.

Waxing Wood Floors

Waxing Wood Floors published on

wax

Ever look at your hardwood floors and notice how dull and scratched they are? But you really don’t want to deal with a full blown sand and poly? Well, the solution may just be waxing.

We researched alternatives to polyurethane earlier in the year when we were getting ready to put our house on the market. The best option for us was to wax with Johnson’s paste and then buff. We bought an inexpensive hand held orbital buffer at Home Depot and it we are still using it.

Waxing is kind of an idiot proof method of getting your floors to look nice. It doesn’t take long at all and it’s as easy as a good cleaning.

Make sure you vacuum up all the dust and dirt, then mop with hardwood floor cleaner and wait until the floor is thoroughly dry before applying the wax.

Let the wax dry completely before buffing! In other words, have patience. You should see a film start to develop as it dries.

Go over the area a few times with the buffer. You’ll know when it’s right when the floor starts to shine. Not a horrible glossy shine, but it will look sealed and protected.

And that’s it. Just don’t do it if you’re getting your floors sanded soon. This is kind of an in-between solution. For instance, I just waxed the apartment where our tenants lived for 3 years. Just wanted a quick fix before we moved all the furniture in. The floors look great now!

Reclaimed Space

Reclaimed Space published on

Reclaimed Space

A small house made an entirely from recycled materials. That’s what Reclaimed Space does. And they come pre-assembled too!

The Texas based company is the brainchild of rancher/construction guy Tracen Gardner. Kimber Reed is the design gal behind it all. Together, they build some super fab sustainable living quarters ranging from 336sf to 1240sf. Prices start at $38,460 for the smallest structure. That includes almost everything, but it looks like delivery is separate.

I totally would have done this back when I was thinking about my new garage that I never did. Too bad I can’t stick one of these babies in my Brooklyn backyard. Hmm…nah.

The Stencil Library

The Stencil Library published on 4 Comments on The Stencil Library

6a00d834537f7169e20120a96a89e9970b-400wi.jpg

The mother load of stencils! The Stencil Library claims to be the world’s largest stencil mail order collection. You know what? They ain’t kidding!

Not only does their catalogue list over 3500 designs, but they also sell accessories and give DIY tips on the site. There are even more how-to’s and room photos on their Design Inspiration blog.

Oh but wait! There’s more! For those of you who just want to write something on your damn wall but can’t align individual letters, there’s an easy way out. Design your own words or phrase in a font of your choice. I do have to point out how lame you are if you can’t figure out how to take a level and draw a straight line, but….I’ll admit….I’d probably choose to take the shortcut too. The measuring between letters? Yeah, it’s a pain in the arse.

The Stencil Library is a Brit company, so shipping will be pricier for those of us on this side of the pond.

Happy Stenciling!

6a00d834537f7169e2013485f0563d970c-400wi.jpg

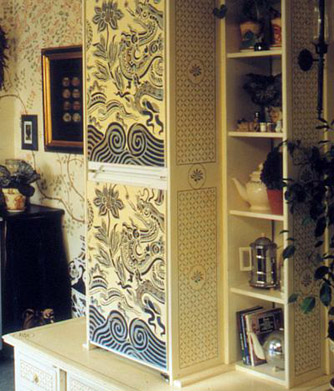
Hello! This object is a refrigerator!

Useful DIY Sites

Useful DIY Sites published on 1 Comment on Useful DIY Sites

fh05apr_fenpla_01.JPG

Since I’ve been so bad about posting my own DIY tips lately, here are some great sites with easy to navigate home improvement posts.

Bob Vila. The King of Home Improvement! Needs no introduction, but if you’re novice, perhaps you don’t realize the awesomeness of Bobby V. His site has step by step videos of each project, so if you’re too lazy to look at instructions, just watch.

Fine Homebuilding. This is a site for pros. You do have to become a member to access much of the site, but it’s worth it. Before The Internets were created I subscribed to the magazine (remember those things made of paper?). I ripped out the more useful articles and still keep them in a binder to this day, even though I never look at them because it’s easier to go online. Not only do they have DIY instruction, but they go over materials as well.

Family Handyman. Ok well, my biggest problem with this site is the name. I typed in “FamilyHandywoman.com” and guess what? They own that too! But it just forwards you to the MAN site. Grrr. One more thing….check out the photo above. That’s from this site. Why is the guy doing all the work while his bitch is just sitting there? Oh, they have photos of females working…on easy garden projects. (As if any of the other sites are better.) Anyway, regardless of their sexism, it’s a good site. Each project is broken up into a summary, tool list and step by step guide. So easy, even a man can do it!

House Renovation Tips. There’s so much information here that I’m not sure if it’s actually someone’s blog or one of those blogs that grabs content from elsewhere. In any case, I’m including it because da bomb. (Yeah, I said that.)

DIY Network. Categories are listed near the header and there’s a search bar waaay up top. The nice thing about this site is that they give you time, cost and difficulty estimates on each project.

Garage Face Lift

Garage Face Lift published on

4940843789_8b6bef8009.jpg

So, the Beacon house has been on the market for nearly four months now and we are freaking out, man! We’ve decided to give it one more month (maybe two) since the summer was sort of a dead zone and then we’ll have to think about renting it out until the market picks up again. That being said, just when we’re about to give up, it looks as if we may have a few interested parties. Fingers crossed!

The plan over the weekend was to go up to Beacon and ready the exterior for winter, should we end up keeping it or should the new owner take over during the cold months. The front of the house was painted when the new porch was put in, but the rest of the house is screaming for a paint job. (BTW, what ever happened to people who think it’s romantic to work on an old home? Are we the only ones left?) No, the two of us didn’t repaint our entire house over the weekend. We did scrape and touch up the worst bits. Now it just looks patchy but maintained, instead of neglected. At least this way, if it doesn’t get painted until next Spring, the clapboard isn’t rotting away.

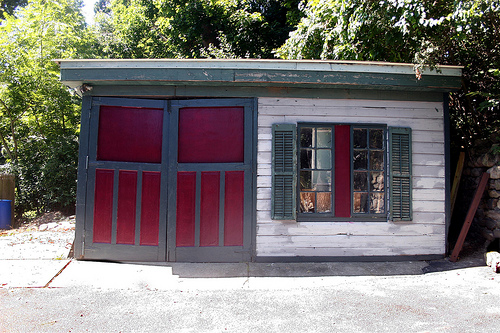
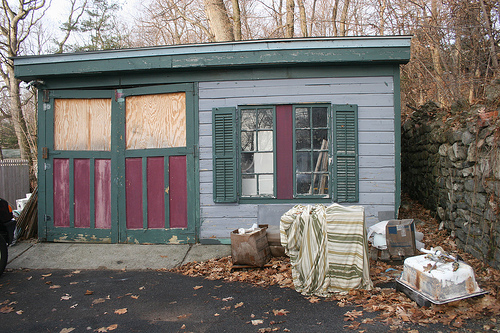
The garage face lift was just that. Like an aged has-been getting her face pulled tight when her neck remains wrinkled and saggy, the garage now looks better at first glance. We’re not trying to fool anyone. The structure needs complete rehabilitation at best or needs to be torn down and rebuilt. The waste of half a day and the leftover paint was decided upon when we realized that this is the first thing people see when they pull into the driveway. So, now at least it looks like a charming dilapidated shed instead of a total eyesore. Smoke and mirrors. Curb appeal. Whatev.

garbef.jpg

Ancient Artifact Unearthed

Ancient Artifact Unearthed published on

img_0658.jpg

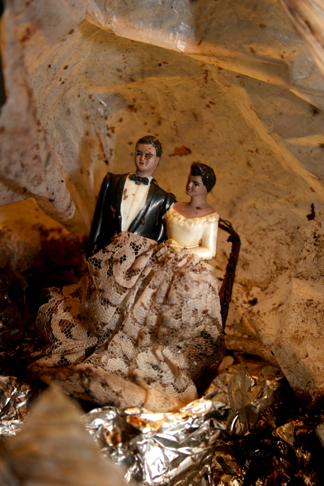
The hubby was cleaning out the basement over the holiday weekend (What, did you expect us to barbecue?) and discovered a vintage wedding cake. It was a very eew moment. The cake was sitting in a plastic bag in a freezer that hasn’t been plugged in at least since we got the place in 2005.

See all the black gunk? Yup, the icing.

After careful evaluation, we’ve dated the artifact around the 1980’s.

This is one salvaged item that ended up in the trash.

Primary Sidebar