Skip to content

DIY Home Security:Webcam Surveillance Systems

DIY Home Security:Webcam Surveillance Systems published on 2 Comments on DIY Home Security:Webcam Surveillance Systems

Guest post by Jeremy Kushner, a home security and automation enthusiast who blogs on topics related to crime, security, home improvement and automation. You can find more of his posts at his blog, Home Alarm Systems.

Do you ever wonder what happens at home when you aren’t there? Would you like to be able to view your front door, back yard, home office or check in on your pets from your cell phone or office computer? Home video surveillance systems are becoming more affordable and smarter.

You’ll need these things to get started.

– Computer with good processing power and internet access
– Web cameras
– Surveillance software

Webcams

Since webcams are inexpensive and easy to connect, it’s a great place to start with a DIY home surveillance project. Select cameras based on where you want to place them and what you want them to capture.

Better quality video makes it easier to view facial features clearly. It is best to use a higher resolution video such as digital 720p or 1080p. Lower resolution cameras also work well and may be just fine for most locations, they are also less expensive.

A few top rated webcams that support both Mac and PC include the Logitech HD ProWebcam, and Webcam C525, Creative Live! Cam Socialize HD AF. Microsoft’s LifeCam Studio Webcam does not work on a Mac, but is a good camera. These webcams range in price from $40 to $99.

Surveillance Software

Depending on the type of features you desire, you can find free or low-cost software for managing your cameras under $70.

Freeware – Free downloadable software

Two free, easy webcam software, Yawcam, short for Yet Another WebCam, and Vitamin D are basic and easy-to-use. Both support live video streaming and still shots and are perfect for use at home.

Vitamin D supports one camera and offers a search view with thumbnails and color coded frames with people in them. It has unique video clip rules such as detection of unknown objects or people inside or outside of a set area; it can even detect loitering. It will record, send an email or play a sound when a video clip rule is broken. Both Yawcam and Vitamin D feature motion detection. Yawcam’s features also include a built-in web server, text and image overlay and FTP image uploading for safe storage.

Low-Cost Downloads

For more features, WebCam Monitor by Deskshare allows you to monitor, preview and record one camera at a time. It’s ideal for monitoring a small area such as a home office or playroom. WebCam Monitor is available as a free trial and costs $69.95 to purchase.

WebCam Monitor not only offers motion detection, but sound detection too. This is a nice feature not found in many low cost monitoring software systems. The system also starts recording before motion is detected, capturing the event immediately, without delay. Recording can be scheduled at set time intervals to capture time sensitive activity. The system sends email alerts, and has audible alarms.

If you’re looking for multiple camera support, try Security Monitor Pro, the professional-grade version by Deskshare.

Another affordable download is the Willing Webcam by Willing Software. This too has a free trial and can be purchased for $39.99.

Not just surveillance software, Willing Webcam enables you to use it for video capture and distribution. You can stream live video or time-lapsed images from your webcam or other video sources to a web site.

Willing Webcam’s surveillance features include motion detection, email, text or image alerts, remote access and management that allow you to view and control the system while you’re away from home. Add date stamps to images and video and archive them safely via FTP upload.

Willing Webcam comes in both a “Lite” and full-featured version. The Lite version doesn’t offer some of the convenience features such as email or image alerts, remote management, FTP upload or video streaming.

Once you choose your software, you’re ready to go. After you have your system up and running, you’ll find it useful for things like being alerted about break-ins, yard and porch thieves or misbehaving pets taking it out on your furniture and ensuring your peace of mind while on vacation.


Curb Appeal: Window Boxes

Curb Appeal: Window Boxes published on 1 Comment on Curb Appeal: Window Boxes

How do you accessorize the front of your house for not a lot of money? Well, window boxes would be a good start! The bright box shown above has a DIY tutorial on the Lowe’s website.

I like this interchangeable plant idea because you can never get bored. Stephanie Lynn lists ten window box DIY project plans in her post!

The Polished Pebble posted Pottery Barn planters. Pleasantly pretty.

It’s not all about the box. For folks like me who can’t maintain live plants, this is a great idea! Bottle holder window box. Personally, I’d make sure those bottles are secure in there, knowwhatimsayin?

Who says you even need a real window? This reclaimed wood window box is for sale from Aunt Debbie’s Country Store for 24 bucks. For that price, I wouldn’t even bother taking the time to make it myself. Just order it.

How To Build A Planter Box

How To Build A Planter Box published on

Welcome new advertiser, Bunnings Warehouse (see sidebar)! They are Australia’s version of Home Depot. The mega home improvement store has a great website to boot. Check out their DIY section, including videos, brochures and planners.

The site also gives tips on sustainability and energy cost savings.

So go on and get lost among the 146 DIY videos on subjects ranging from choosing paint to installing a pool.

Refacing Furniture

Refacing Furniture published on 2 Comments on Refacing Furniture

Hey kids! Here are more ways to save those pieces of furniture from the landfills. Plus, your friends will envy you for your kick-ass creations!

Idea #1: Plaster some vintage signs on that sh*t.

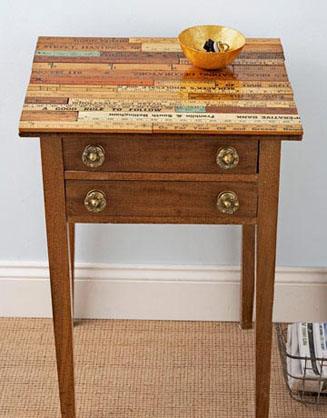
Idea #2: Old rulers and yard sticks! I’ve made frames and small pieces from rulers but never thought to do an entire surface. Pretty cool.

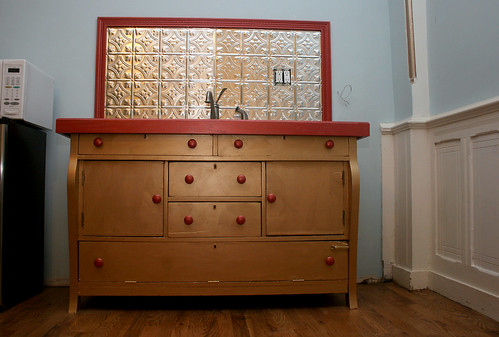
Idea #3: Laminate. Gorgeous laminate. I wouldn’t even know where to find stuff like that.

Idea #4: Got time on your hands? Bottle cap it.

Decorating Doors

Decorating Doors published on

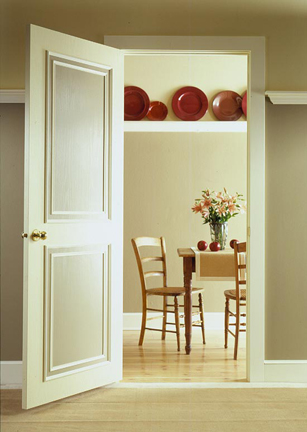
Got a bunch of plain doors you don’t really want to replace? Fancy them up instead of removing them. Start with a colorful paint and some antique hardware and go crazy with other techniques.

Ok, so the door above is actually a beautiful antique door to begin with but you can use chalkboard paint on any door. Mount an old frame or some molding around the chalkboard.

Create your own panel door. Do as many panels as you like. Whatever width of molding you want. Personally, I find mitering to perfection a bit difficult, but the good news is that there are ways to cheat.

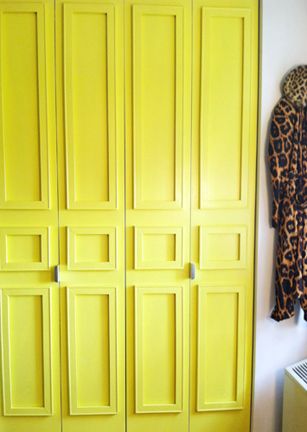
This is a great fake-out. That door just has painted panels. No carpentry involved! Oh my, it doesn’t get any easier than that.

These panels were made from pre-cut artist stretchers that interlock. Miter schmiter.

Don’t forget that any of these techniques can be used on kitchen cabinet doors as well.

The Finish Line

The Finish Line published on

IMG_7983

The only time we’ve ever finished our renovations have been when we put a house on the market. Well, this time we’re not going anywhere but it’s probably a good idea to finish our own house before taking on the next project.

The thing is that we’ve lived in a construction zone in one house or another for the last 18 years so we are quite used to it. Plus, this place is so close to being done that we tend to forget there’s still work to do.

Nobody ever realllly finishes their renovations anyway, do they?

Here’s the punch list. I don’t have too much faith that we’ll get it done any time soon, but perhaps we can check off a few items.

1. Light fixtures. I keep buying them, but I don’t install them.

2. Paint basement steps.

3. Convert work room into dining room. Ugh. Now that I’m embarking on my first flip, the Reclaimed Home store is going out of business. I now have the task of liquidating my merchandise and crafts. Years of crap to sift through. Then I just move the table and chairs in, right? Nah, we want to take down a wall. Demo in an already finished room.

IMG_9293

4. Get rid of pissy cabinet. It was nice while it lasted but we no longer need a sink downstairs. Plus, the cats are peeing on it.

5. Get rid of cats. Only kidding!

marble

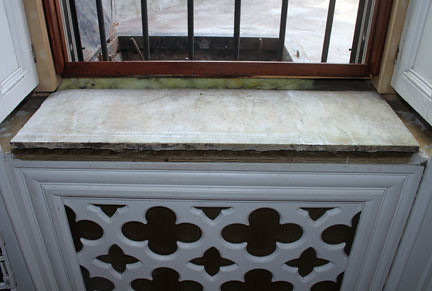
6. Molding for window sills. We did the marble and never finished it off.

7. Fireplace screen. It’s not fixed to the mantel and it needs painting. Currently being held up by a table I pulled out of someone’s trash. Classy.

garden bath door

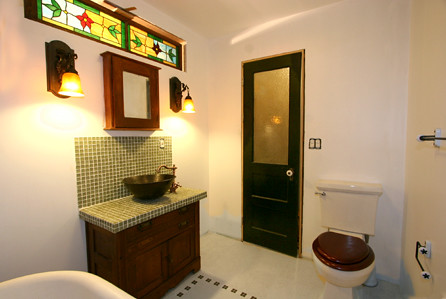
8. Molding in bathroom. We finished that bathroom 5 years ago and still, no molding.

9. Redo stairs from garden to parlor level. Yeah, that’s a job for the stair guy.

10. That damn deck! Ha, it’s going to go another summer before we get to it.

Groovy Stairs

Groovy Stairs published on

Howzabout some ideas to spice up those steps? These can be done without rebuilding your whole staircase.

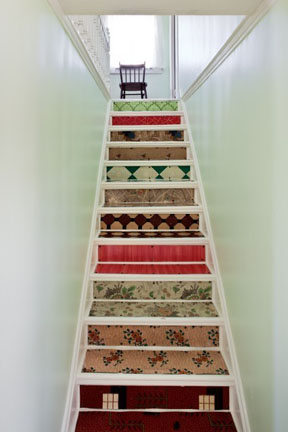
Lovin’ the vintage linoleum stairs but it’s hard to come by real vintage lino these days.

Soda crates! Or choose any kind of crate you can get your hands on. Notice how they just inserted the reclaimed treads in the middle without messing with the bannister?

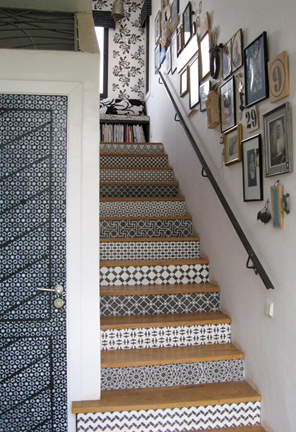
These are actually porcelain tile. They fooled me. I thought it was stained or faux painted wood. The Italian tiles are awesome but they may be pricey and hard to come by. Nothing wrong with using the real thing. Just sand and stain.

Oy. That seems like a ton of work. Not to worry. Cut the risers and stencil them on a table BEFORE installation. Still a ton of work but at least you won’t break you’re neck.

Home Siding Options

Home Siding Options published on

I’ll be looking at a few outdated ranches this week. I suppose you can say that’s more of a challenge than restoring an old farmhouse. In anticipation of this possible project, I’m trying to come up with some fun ideas for the exterior.

Now since money is the main factor, as long as the -ugh- vinyl or aluminum siding is in good shape, the least expensive thing to do would be paint it some funky color. Yes, these surfaces can be painted as long as they are properly prepped. The cute yellow house above has painted aluminum clapboard.

Remember that awesome bungalow in The Rockaways? Corrugated metal seems like a more modern and tasteful approach than your run of the mill siding.

Board and batt can work with any style home, from a church to a barn. If it’s a straight siding job, you can assemble and paint before installation. Sure, there will be touch up, but it should be much easier than painting once it’s attached to the house. You can and should also pre-paint wood clapboard.

This is 4’x10′ sheets of hardipanel ripped down to 24″ and painted. As long as it keeps the water out and isn’t crazy to maintain, there are plenty of materials out there that can be used as alternatives to plain ole’ siding.

Here’s what they call “Redneck Siding”. What does it say about me that I love it? And it can be made from 100% recycled materials!


Can’t decide? Why not mix it up? Here’s a variety of reclaimed materials that would probably work well on a raised ranch as there varying depths on the exterior.

Bathroom Before and After

Bathroom Before and After published on

4th fl bath

Before

When we moved back to Brooklyn and took over an extra floor of the house, our tenant lost his access to the shared laundry room, so we told him we would give him a washer/dryer upstairs. Somehow he got a whole new bathroom out of us since we were doing the installation in that room (w/d not seen in photo). We paid for materials and he did the work. We collaborated on the design, but it was mostly him. You know I’m not a modern kind of gal. I like it though!

IMG_5511

After

Ok, so these aren’t really the “after” shots of the the bathroom. They are the “almost finished” photos I took back in June. The blue tape is now gone, the vanity has been painted black and there’s a window instead of plastic. The washer/dryer is hidden behind dark glass that matches the shower door.

Oh, here’s a way before shot below, from when we first bought the house. We just kind of updated it for awhile without gutting it. BTW, of course we found wood rot and other damage when we ripped it apart. We also gained about 3 inches of height since there were layers of tile and concrete that needed to come up. Gotta love these homeowners who just put band aids on stuff and leave it for the next guy or gal.

Before:4th fl bath

Way Before

Conversations with a Homeseeker

Conversations with a Homeseeker published on

Pond

Deb has been looking for a house for awhile now. Anything that has a decent renovation goes into a bidding war and as a first time home buyer, she’s reluctant to take on a huge renovation. She tries to wrap her head around fixer uppers and homes that are not her style, but lacks confidence in her “vision”. So, I nudge her along.

I sent Deb before and after shots of the second home we renovated, a weekend place we had up near Stone Ridge from about 2000-2004. I’m posting the conversation along with the photos because it’s Passover/Easter weekend, so you want I should actually write a real post?

Happy Holidays, y’all!

Side view

Ok, so D=Deb and M=me

D: Very cool.  So did you buy all the furnishings? How long did all of that take? Was that a flip or that was your house?

M: No, we never did an actual flip before! That was our Kingston house. We put too much money into it thinking that we would keep it forever (which we’ve done on all 4 houses). We owned it for about 4 years and renovated slowly the entire time. When we decided to sell, we finished the reno. I don’t know how long that was in actual reno time because we stopped and started so many times. It was our weekend project for many years. We went up there to get away from our Park Slope renovation.

D: Considering that you like wild colors and all it seems rather tame for you, no? But in line with what it is.  I likey.

LR/Fireplace

M: I think I did that because everything was so dark when we bought it that I just wanted LIGHT.

D: The dining area, you covered the beams, is that what I’m seeing?

Before: LR/Fireplace

Before. Obviously.

M: Not really. Those “beams” were faux, made out of foam. We ripped them down. The house was modular and came in 2 sections. That beam running down the middle is the joint. It was never bolted together until we did it. Or maybe it had a couple of bolts, but not to Luke’s liking.

D: Gawgeous. Did you and Luke do everything, like you lay the floors yourself etc?

M: Did not do everything. Hmm, I remember laying out the floor but I don’t remember nailing it down. We had a contractor working beside us. Not sure if he installed or we did. I know that he sanded and polyed.

D: Please tell me that wood floor was under the carpet? har har

M: Oh please, girl. That house was carpeted throughout. It had plywood under all the carpets. The day I was up there alone ripping up carpeting, my dogs were running around outside (we had 7 acres) and one of them came back with a deer leg and dropped it right in front of me. They didn’t kill the deer. People were hunting illegally on the property. I chased one of them down one day.

Bath

D: Did you add wainscoting or was that there?

M: The wainscoting in the bathroom was just Home Depot stuff we put up. The living room walls were originally brown wall paneling. We wanted to do that “bat and board” look, so we had a contractor install actual boards piece by piece. Then the previous owner asked why we didn’t just put up plywood and use 1×2’s to create the same look. We were like “Oh yeah. We could have done that.”

D: So, can you do this to the 6th avenue house I like?

M: No I’ll be busy working on my own.

D: This is why I do wish you could sit with me look at a house I like and advise me on how I can make it look a certain way. Darn you!

M: So find a house you’re going to put a serious offer on and I’ll go with you to second showing. But it’s really not as exciting as creating my own mess.

D: Sweet, thanks for sending

Learn DIY Stuff

Learn DIY Stuff published on

Here’s a list of the upcoming House & Home Courses At City Tech Continuing Education.  They are located at 25 Chapel Street, Howard Building, 4th Floor, Brooklyn. Register online or call 718 552 1170.

LUNCH WITH LARRY UBELL
HHT 110
Sec A:  Sat, 9 am – 2 pm, 4/21
Sec B:  Sat, 9 am – 2 pm, 5/5
5 hours, $65 per session (Lunch included)

Larry Ubell, WNYC’s “Guru of How To” and Chief Inspector of Accurate Building Inspectors knows houses inside and out. Take a guided tour of houses as an Inspector sees them, with all their flaws and secrets. Larry points out trouble spots and tell-tale signs of building distress.  From slanted floors and mysterious odors to suspicious cracks and leaking windows, you’ll learn what to look for, how to fix it, and what to never try yourself.  Bring a digital “problem” photo from your house (on a flash drive) and go home with some food for thought; then keep the conversation going over lunch – with Larry. Check out some great tutorials from Accurate Building Inspectors

KITCHEN AND BATH DESIGN
HHT 108
Mon, 6 – 9 pm, 4/23 & 4/30
6 hours, $120 (includes materials)

With kitchens and baths, every inch counts.  Bring a photo, a floor plan, and a dream. Learn to make a scaled drawing, select cabinets and fixtures, design a tiled wall and create a budget that fits your needs.  By the end of the class, students will have a working plan for a kitchen or bath.

HANDS-ON HOME REPAIR WORKSHOPS
HHT 078
$55 for each workshop

These hands-on workshops teach you how to make basic home repairs. We’ll show you how to fix a toilet, patch and plaster a wall, change a light fixture, install a lock, unclog a trap, spackle a wall and become your own favorite handyperson.

HOMEOWNER’S BASIC TOOL KIT
Sec A:  Wed, 6 – 9 pm, 3/14

Cut a board, level a shelf; install an anchor bolt in a hollow wall. This class will stock your toolkit with the most useful tools and give you hands-on tips for using them. Discover your inner handyperson and save on basic repairs.

HOMEOWNER’S GUIDE TO BASIC PLUMBING
Sec B:  Wed, 6 – 9 pm, 3/21

Basic plumbing:  how to fix a toilet or unclog a drain. Save on costly repairs that you can do yourself.

LOCK INSTALLATION
Sec C:  Wed, 6 – 9 pm, 3/28

Having a security complex? Install a deadbolt or mortise lock, update existing locks, and replace door knobs.

PLASTER AND SHEETROCK REPAIR
Sec D:  Wed, 6 – 9 pm, 4/4

Repair a crack, frame and tape, patch plaster, fill a deep hole or a nail hole. You can do it!

EVERYDAY ELECTRICITY YOU CAN DO YOURSELF
Sec E:  Wed, 6 – 9 pm, 4/11

How to replace a fuse, change an outlet, install a fixture, test for power and splice a wire.

INSTALLING CERAMIC TILE FOR FLOORS
Sec F:  Wed, 6 – 9 pm, 4/18

How to create a level surface, select floor tile, lay out a pattern and install like a pro.

TILING A BACKSPLASH OR BATHROOM WALL
Sec G:  Wed, 6 – 9 pm, 4/25

How to layout, install and grout a kitchen backsplash or bathroom wall.

PAINT LIKE A PRO
Sec H:  Wed, 6 – 9 pm, 5/2

A great paint job is method, not madness. This course teaches you how to prep the space, select the right tools, and apply paint like a professional. Please wear old clothes.

10 Money Saving Renovation Tips

10 Money Saving Renovation Tips published on 1 Comment on 10 Money Saving Renovation Tips

If you’ve been reading this blog everyday since it’s inception, you know all this like the back of your hand. It’s “Reclaimed Renovation 101”. But here’s a list of tips again just in case you’ve missed a few.

1. GC your own job. If you have the time and organizational skills, you can hire sub-contractors and oversee the project yourself.

2. Sweat Equity. Even if you don’t have mad skills, there’s gotta be something you can do to save some bucks. Demolition? Painting? Stripping paint? It’s called “grunt work”.

3. Re-used Materials. Buy second hand cabinets, appliances and building materials at places like Build it Green and Green Demolitions.

4. Architectural Salvage. Need doors? A fireplace mantel? Medallions? Light fixtures? Forget Home Depot! Yuck! Check out the salvage yards in Brooklyn, upstate and Pennsylvania.

5. Recycle your own Materials. Maybe you can re-use that wide plank sub floor. Those kitchen cabinets might not be so bad if you painted them. Many materials in your home may not need to trashed, only re-worked.

6. Craigs List! Check out the “free” and “materials” categories. You may find some company liquidations or overages on other renovations. Tile, flooring, maybe even sheetrock.

7. “Oops” Paint. If you only have a small room to do, look at the opened paint shelves at Home Depot or other paint stores. You can pick up a gallon for five bucks or so. Colors are already mixed though.

8. Day Laborers. Yeah, I know…illegal and risky. I shouldn’t recommend this, but…

9. Liquidation Stores. There’s one on McDonald Avenue in Brooklyn that sells everything from flooring to toilets. There’s also Lumber Liquidators.

10. Friends. Cheaper and more legal than day laborers. Just get them pizza and beer.

Primary Sidebar