
Previously, we did a DIY on repainting cabinets. We didn’t go over the faux technique we used on these cheapest of cheap Home Depot jobbies we salvaged from the house. Our tenant who inherited the cabinets told us that everyone who comes to visit asks about them. So, we figured we’d share.
See the first post on preparation and tools. You will need glaze and water based polyurethane in addition to the materials listed in that article.
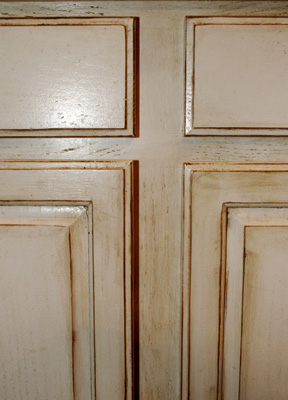
Make sure you have 2-3 coats of gloss or semi gloss paint on the cabinets. Here, we sanded every raised edge down to the wood. We did it with the palm sander, but be careful not to hit anything but the raised areas. You can also sand it by hand, but it obviously takes longer. Alternatively, you can skip this step and just glaze the pieces for an aged look.
We’re assuming you’ve chosen your base and glaze colors in advance and your glaze is pre-mixed. Paint it on with foam or brush and wipe as you go. You may want to keep some paint thinner handy just in case it dries too quickly and starts to look “dirty”. You’ll probably have to go over certain areas a few times until you get the hang of it.
Once it’s dry and you’re pleased with it, it’s time to seal it with polyurethane. Oil based would be ideal for wet, messy kitchens; however, if your base coat is a light color, oil will yellow it, so we are recommending water based for light colors. Give it 2 coats at least.
And that’s it. Pretty easy.
2 Comments
OK, umm, what time should I expect you to stop by my house? What kind of tea do you like? Pie?
You do all my posts for a week and I’ll do your cabinets. Deal?
Oh, plus pie.