
Posts categoriezed as Brownstone
Everything You’ve Ever Wanted To Know About Brownstones

Spring 2010 Offering: Layouts and Lifestyles
Course Code: BRNS 032
Date: Saturday, 3/13
Time: 1 – 5 pm
Fee: $40
Directions: click here
When it’s time to renovate your Brownstone, there may be nothing like the original. But how do you create a floor plan that fits your lifestyle? During this edition of the popular Anatomy of a Brownstone series, we will mix a little history and a lot of examples of what your neighbors’ Brownstones look like inside and outside their old homes. Architects and designers will show you how to fit your family’s life and style into a classic Brownstone.
Speakers
1 to 2 pm
Alexander Stoltz AIA, Vaidya Stoltz Architects, and Kenneth Conzelmann, RA are members of the City Tech Architectural Technology department.
They will share examples of recent projects and offer insights into the architectural process- from ideas to finished home.
2 to 3 pm
Gennaro Brooks-Church is a Certified Eco Broker, LEED AP, National Sustainable Building Adviser and the founder of Eco Brooklyn, a company that focuses on green brownstone renovations. He will discuss passive design approaches for creating energy-smart brownstones.
3 to 4 pm
Interior Designer Judith Angel, Allied Member ASID, will show how to bring rooms into focus using principles of form and design. Learn to use the objects you own and love as the starting point for a room that is distinctly your own.
4 to 5 pm
Debra Salomon, Program Developer at City Tech Division of Continuing Education and owner of 408 Group Design, will share favorite sources for fixtures and furnishings that will fit your style and budget.
Download registration form here and complete. (Include course code)
Ways To Register:
By Phone: Call 718 552-1170

By Mail: Complete registration form and mail check or money order to:
NYCCT Continuing Studies Center, 300 Jay Street, Howard Building 4th Floor
Brooklyn NY 11201
Walk in: 25 Chapel Street, 4th Floor, Brooklyn NY 11201
Click here for directions
DIY Upcycled Door Radiator Covers
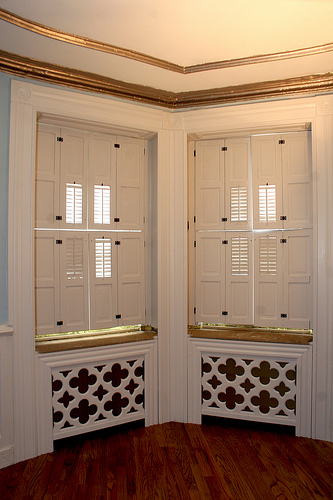
A thousand years ago we raided this Prospect Heights home for free reclaimed materials. The couple were about to embark on a massive renovation and posted their salvage on the Brownstoner forum. It was free for the taking, the only catch was that folks had to bring tools and remove everything themselves. Kind of like a demo party, only we had to be very careful.
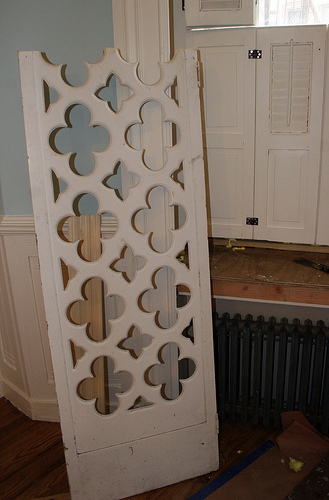
We snatched up a bunch of goodies that we’ve used or I’ve resold. The two closet doors sat around for awhile. I thought of making tables out of them but then decided on radiator covers.
This was a pretty easy project because the radiators are set back, so we didn’t have to build sides.
All you need to do for this front cover is build a picture frame without the bottom. If you have all of the necessary power tools, I probably don’t have to tell you how to do this. If not, you’ll need a miter, hand saw, staple gun, hammer and nails or screws and a drill, glue and a tin snips.
Measure twice cut once. Measure twice cut once. Measure twice cut once. I can’t stress this enough.
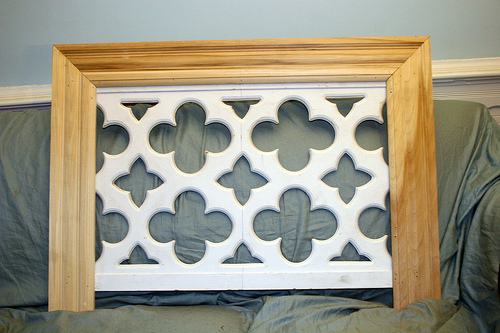
So you you miter the frame, glue before securing and add the decorative piece to the back.
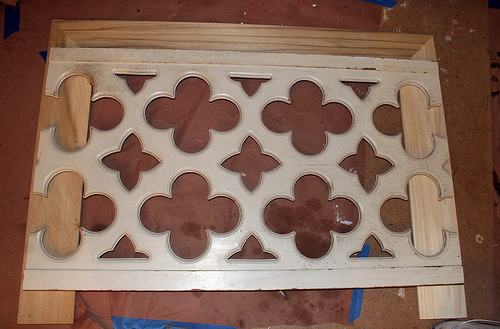
Here’s what it looks like from the back.
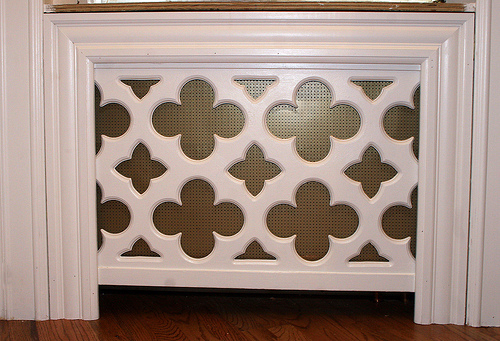
Voilà! Painted with the mesh backing. Now searching for salvaged marble slab for the window sill.
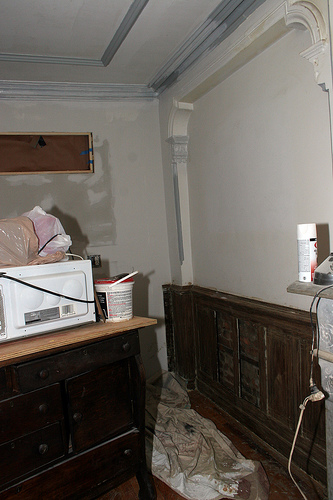
Our Mini Kitchen
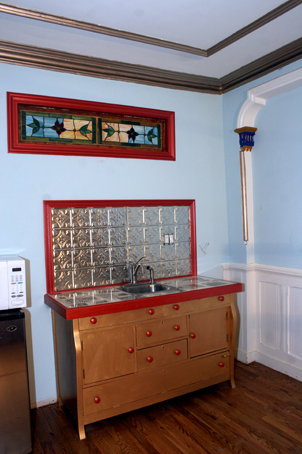
You saw the kitchen counter top a few weeks ago. Now the entire kitchenette is finished! Almost. Since we don’t live in Brooklyn full time and we don’t cook, there’s no need for a real kitchen. A microwave, toaster and electric kettle will suffice. Nope, not even those plug in burners. We have menus.
This cabinet, made from an antique sideboard, is pretty much the kitchen. We’ll probably build some shelves above the mini fridge and maybe try for more storage on each side, but what you’re looking at is the “work station”.
This is what took us about 3 years to complete (well, the whole apartment), but no more washing dishes in the bathroom sink! Weezy, we’re movin’ on up!
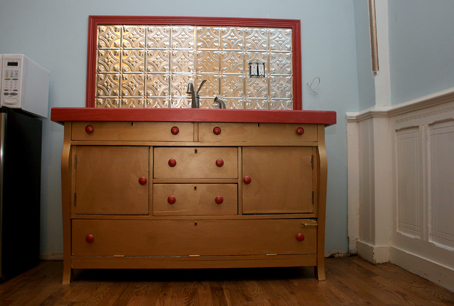
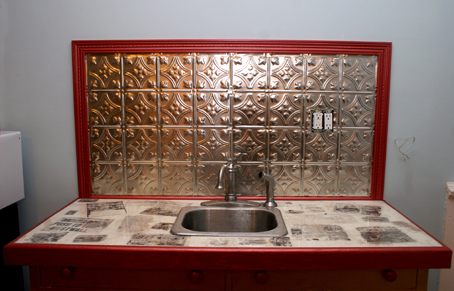
Brownstone’s Past in Resin Counter
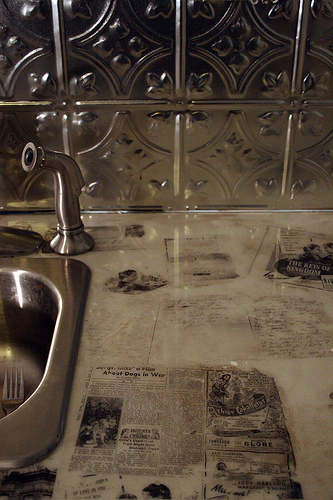
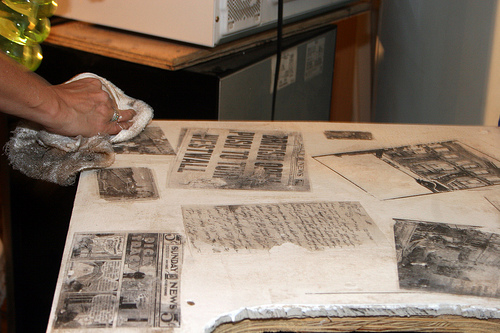
Ever since we found old love letters and newspapers in a cubby hole during demolition, I’ve been meaning to incorporate them back into the house so they can remain part of the history. Well, four years later, the kitchenette resin counter top is finally (almost) finished!
The idea was to use the original letters and newspapers, but Emilia, an expert on various processes, thought it might be too thick and cumbersome under the sealant, so she recommended the photo transfer process. Nothing about this process is particularly green. The only thing reclaimed here is the history.
Here’s a step by step of what was done:
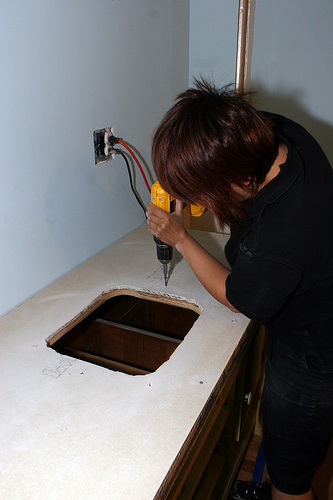
1. Emilia suggested we use a masonite board (There’s a name for this. Emilia?). It’s lightweight and waterproof with a smooth surface. Unlike wonderboard, it remains intact when screwed down.

2. Primed and painted.
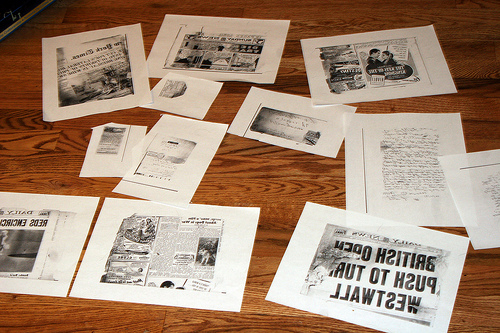
3. Print images on an inkjet or have copies made. It doesn’t matter if it’s toner or ink. One thing you should remember (which Emilia didn’t!) is that you need to print backwards if there is writing. The transfer is a mirror image.
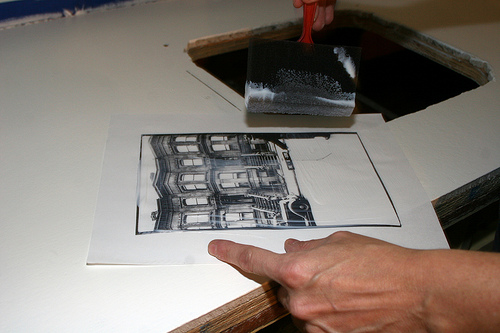
4. Apply painter’s medium to counter and back and front of photo. Enough so that it’s well covered, but don’t overdo it. I tried Mod Podge on another project and although it worked, I don’t think it transferred as well as the medium.
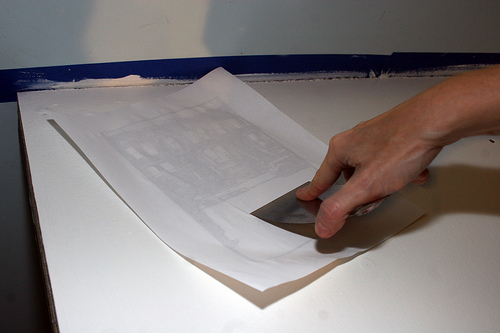
5. Use a scraper tool to spread the medium around once you place it face down on the countertop. Leave it for a about a minute.
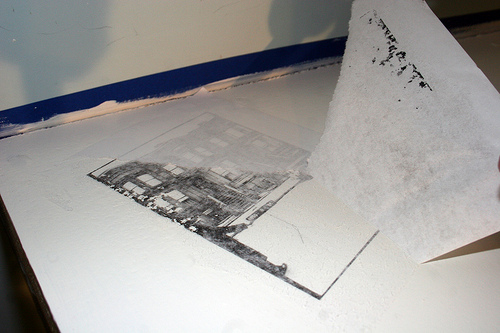
6. Test a corner first to make sure it transferred. It doesn’t all peel off perfectly at once. There will be paper residue. Take a damp sponge or better still, your fingertip, and rub the spare paper away until smooth. Not too rough or you’ll take the image away!
7. Optional: We glazed it with a metallic bronze to give it an aged look.
8. Let dry overnight before applying resin.
9 and beyond. About the resin, it’s a 2 part solution. You just have to make sure to mix it really well. Keep mixing if it’s taking a while to apply. You can pour it or brush it on. Make sure it’s thick enough. I ended up doing 2 coats. To deal with air bubbles, use a heat gun for a few seconds. It will take a few days for the resin to properly dry, so make sure you stay out of that room so as not to kick up dust or anything.
And that’s it. Our resin is so smooth. It looks like buttah!
Wet Stoop in Front, Hole in Back
Guess the husband got bored with our half finished living room so he decided to start a new project. He and the next door neighbor are digging up our backyard and adding some drainage. At least that’s what I think he said. Why else would he have that huge hole back there?

Our basement doesn’t exactly flood, but it gets pretty wet. By changing the pitch away from the house and putting in some drains, the problem should be resolved. The water damage was already repaired on the interior of the house, so if we don’t deal with this soon, we’ll have done that work for nothing.
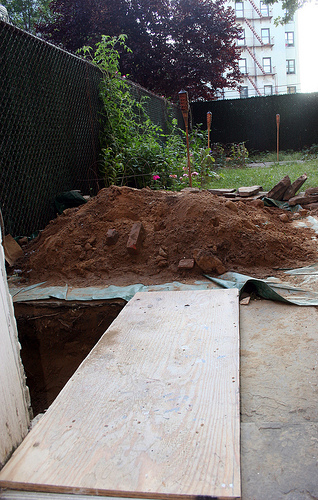
My husband thinks he’s Mr. Safety, but see that sheet of plywood? I put it there. He had the hole dug right near the back door, no covering and no warning given to anyone else in the house.
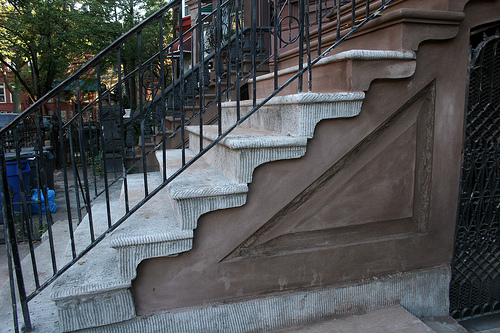
Remember our $10k stoop? Yeah, still working on it. The guy is doing a nice job, but he’s taking his sweet time. Granted, we had to wait a few weeks for the cement to set. Granted, it was a crazy, rainy summer. But there were plenty of days he could’ve showed up that he didn’t. Typical contractor, focusing on getting the jobs but not pleasing his clients.
The other night when we got home, there was a wooden stick blocking the steps. We use the garden gate, so no biggie for us, but there was no warning for the tenants. Why not do every other step or half the step so they can go in and out?
Well, we’re used to living like this. I just hope the tenants had no intentions of hanging out on the stoop or barbequing in the back for the remaining days of summer.
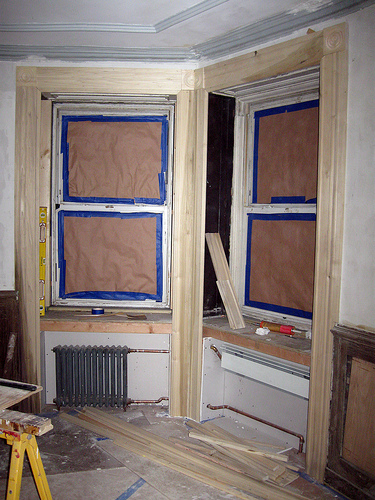
Garden Apartment Now Livable!
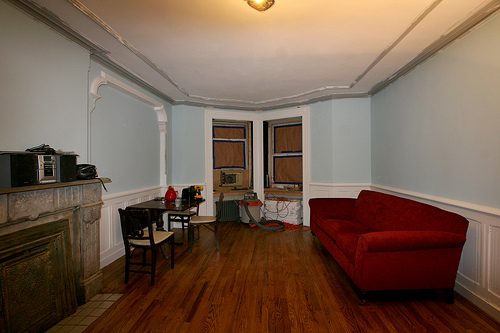
After four years of restoration, two of those years on this particular apartment, I am pleased to announce that our dwelling is finally habitable. It’s far from finished, but it’s done enough so that we can furnish it and work around that.
This is normal for us. We haven’t lived in a house that wasn’t under construction since 1994 back when we were renting. Once we get this kitchenette sink in, we’ll probably give it a rest, leaving some areas without moulding or paint for a few years.
But for now…..a couple of weekends off to enjoy Brooklyn.
Ah, seems like only yesterday it looked like this….

Wanna see a “To Do” list?
1. Work around windows
2. Get shutters in
3. Radiator covers
4. Sink, counter top, backsplash
5. Paint sink base
6. Finish moulding
7. Strip doors (ugh, more stripping)
8. Clean up mantel
9. Re-do hearth (damn, forgot about that!)
10. “Fancy paint” for trim and medallion
Related:
Brownstone Progress
Yesterday I posted photos of our new stoop that costs more than an inexpensive car. More than a new bathroom. More than 2 really good vacations. You get the picture.
Z conquered the bulging sides on the first day. He (or I should say “they” as I don’t even know if Z is there) got to the steps on day two. Call me crazy, but I kind of like they way they look now.
The interior work is getting done as well! (Please see post on how I fired my husband)
Funny story about the carpenters. Darren did most of the carpentry on the other apartments. He’s an excellent carpenter but a bit of a Diva. He’ll show up one day and then you don’t hear from him for 2 weeks. One of those, you know. So, I called Bill the stair guy, also a carpenter. Good old reliable Bill. Great work, inexpensive and shows up.
Well, Bill had some difficulty getting back to me this time. He came in to look at the work and then I called him 3-4 times for the quote. “Oh, I’ll call you back in 10 minutes.” said he, every time. Meanswhile, we never did tell Darren we were talking to other carpenters….just in case.
And good thing we didn’t! It was actually Darren who came through for us in the end. Never mind the fact we had to go over to his house and drag him to ours. It worked. Now all but one door has moulding and that’s simple enough for us to do.
You know what that means, kids? The final chapter. It’s time to paint.
(Ok, I may be jumping ahead. There are doors to strip, radiator covers to be made, a countertop and backsplash……. but it’s livable! Kind of.)
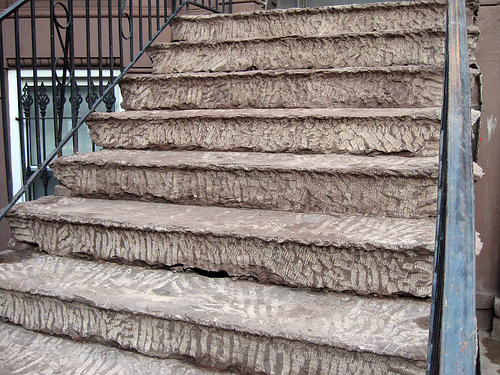
The $10,700 Stoop
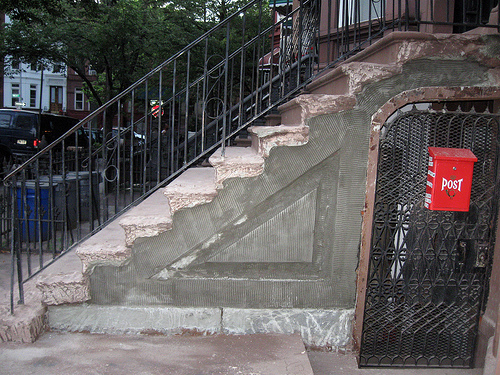
So, our brownstone stoop was collapsing and we couldn’t put it off any longer. Yes, we are DIY maniacs, but detailed masonry is not our forte. Unfortunately, I didn’t take before shots, but that side detail was a big bulge, “fixed” by the previous owners over the years. The gate was coming away from the frame, making it mighty difficult to open.
There were a bunch of recommendations for Z. Abedin on the Brownstoner forum. That’s the guy we went with. Licensed, responsible (like he actually shows up when he says he will!) and not as pricey as some of the other brownstone guys.
Could we have gotten this for less? Absolutely. The people up the street are getting their facade done. It’s a total mess and the scaffolding looks dangerous. I’ll bet they would’ve done our stoop for less than half the price. But sorry, it looks like they don’t know what they’re doing. I feel bad for my neighbor.
Something I didn’t know….the longer the scratch coat cures before applying the brown coat, the better it will “take”. It should be a minimum of 2 weeks, but Z suggested even months. That’s fine with me, since we’re paying him in installments. The only thing is, we’re going to have a gray stoop for awhile.
More progress updates tomorrow.
Related: Holes and Wet Stoops
Bed Stuy Reno Progress
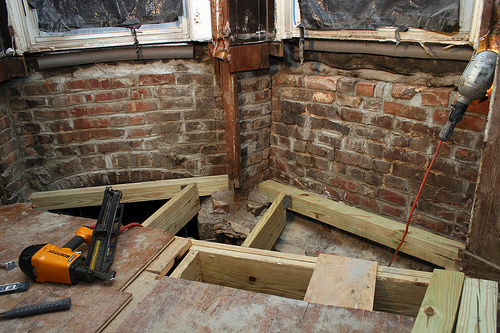
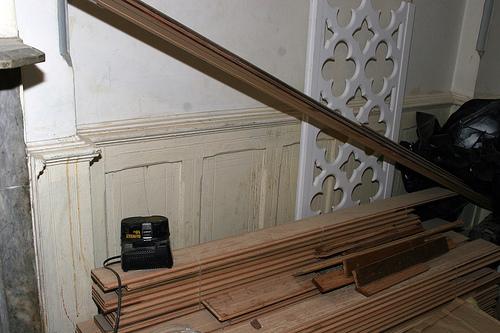
It’s been slow going on our Bed Stuy living room. Hubby has been repointing bricks and adding new joists for an eternity now. He’s supposed to be working on it about three nights per week after work, but I call him about 7pm and he’s always just leaving work, so not much is really getting done.
There have been some baby steps made since I last posted about it before the New Year. Most of the pointing is done and he’s got some new joists in. There’s still plenty of work to do around the windows. All of the wood was pretty rotted from past water damage. Once he s-l-o-w-l-y finishes this and gets it closed in, we’ll have the floor guy replace the tongue and groove and finish the floor. Everything else is a piece of cake. Really, just painting from there.
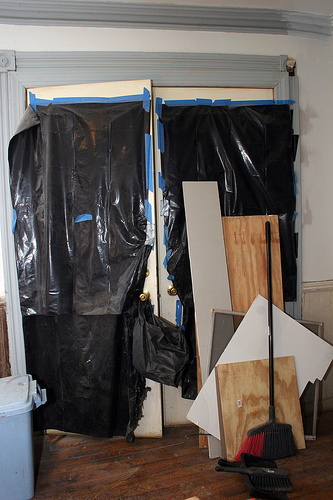
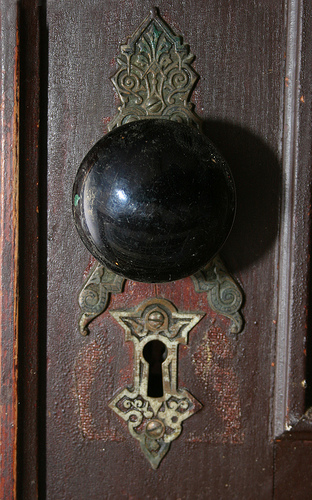
I headed over to Eddie’s on Saturday to look for front doors to our apartment. The previous owner had exterior French doors which we covered with plastic bags since tenants moved in 3 years ago. It matches our window curtains. We’ll use those glass doors in the hallway to let some light in, but we prefer privacy when sitting around the living room in our jammies. When we have a living room, that is.
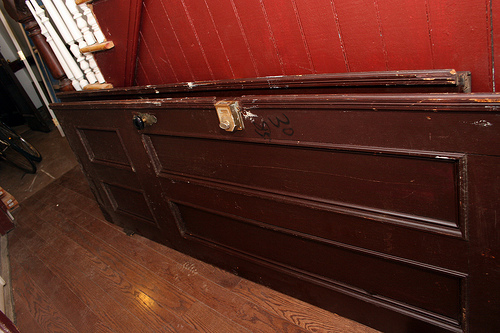
The double mahogany doors cost $100 including the original hardware. It looks like I’ll only need to strip one coat of paint and I don’t even think it’s primed. Might be just shellac. The doors will sit in the hallway for another 3 months at least, but it made me feel like I accomplished something by getting them.
Hey, we’re on a roll, huh? Is there anyone who works slower than us??
Faux Painting Circa 1886
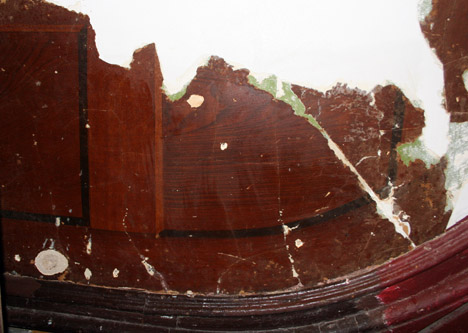
We started chipping away at peeling paint and plaster behind an old radiator in the brownstone and made an interesting discovery. The “wood grain” in the above photo is not wood at all. It’s actually painted plaster and it looks as if it’s original to the house. This was the only area of the hallway not skimcoated during our restoration because the radiator was still connected.
The question now is: How far do we go? Now that we found it, we don’t want to cover it up again.
Do we keep that one area uncovered?
Keep going up the stairs?
Leave the faux as we found it?
Restore the entire thing?
I know what I’d like to do. But I also know our limitations on time and budget. And let’s not forget…this is the hallway. Our apartment is not even livable yet.
What would you do?
Home Girl: Of Drugs and Brownstones
I want this book! Judith Matloff and her husband purchased and renovated a Harlem brownstone years ago. Hilarity ensues when they realize they are living right next to a crack house and have a front yard view of the wholesale drug trade for the entire East Coast. I can sort of, kind of relate in a small way. We lived next to a drug dealer in Park Slope. If he wasn’t such a nasty, girlfriend beating bastard, we would’ve just ignored him. But he messed with the wrong neighbors. Oh, not us, the folks on the other side of him. But we joined in and got him out. So he could deal, threaten neighbors and beat up his girlfriend right around the corner.
Anyway, watch the video. Judith’s druggie neighbors are actually quite pleasant.
Via City Room
Color Scheme Dilemma
As is. Cracked, caulked and caked with paint. We’ll be making radiator covers out of that fancy piece leaning against the wall.
____________________________________________________
Ok, I need your help. Think of this as a poll and your vote will be counted by leaving a comment. Here’s the deal: I usually like dark, gothic looking rooms. I’ve done 3 of the 4 floors in our brownstone with darker walls and stained woodwork and I love it. But I’m bored with that already. I want to shift gears with our apartment. Not to mention that this is the garden level and doesn’t get a lot of light.
I wasn’t sure what I’d find once I started to strip the wainscoting. I uncovered oak with a base coat of brown so it’s nice and patchy and soaked into the wood. This being held together by caulk over the years. Some panels are broken in half and held together by plaster. Not surprising and definitely in line with what I found around the rest of the house. The question is, do I want to restore the wood or just paint it?
I’m thinking paint. Actually I’m beyond the thinking stage. I started to prime it. I’ll have to strip the 50+ years of paint off of all the wainscoting anyway because the details are lost. It kills me that I’m going to cover it up again, but it’s just too much work to have it look eh and make the room dark.
Which leads me to my poll. I’m thinking of a Hollywood Regency meets Victorian meets Art Nouveau look for this room. I’d like to have white walls to bounce light around and color for the wainscoting. I can be persuaded on this matter as I did prefer white wainscoting and colored walls on those internet color simulator things.
Any painted molding in the rest of the house is a deep (brick?) red. Too dark. And I’m sick of it.
Originally I thought yellow. Now I’m over that. It’s my least favorite color.
Now I’m onto a powder blue….like the Volkswagon Beetles. With maybe a gold or silver for the inlay.
Any input would be greatly appreciated!
Not fully cleaned yet in this photo, but you can see it’s going to be a job to get it to look good. We’re turning that server into a “kitchen sink with counter top”.
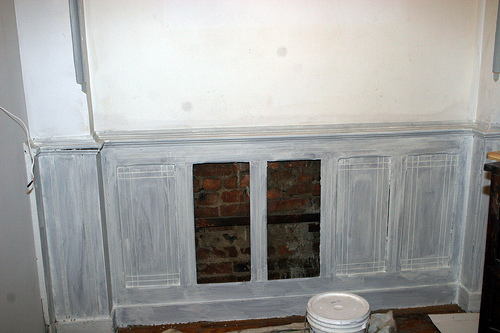
All primed and awaiting a color! So, what say you?
Reclaimed Forum
Ever notice how nothing ever happens on the forum? No? That’s because you never visit. Because nothing ever happens. But I’m still trying to make it work, goddammit. I just posted a couple of new listings for people, but feel free to post your own. Categories: Salvage, Events/Sales, Pets, Sustainable Living, Real Estate and General. What are you waiting for?
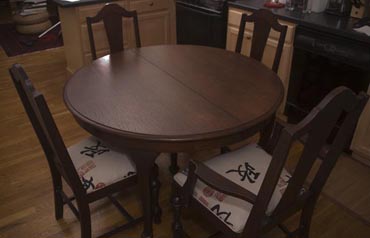
1930’s Dining Room Set: $500
![]()
New York City College of Technology Division of Continuing Education
Home Design and Green Design Courses: Spring 2008
An ongoing series devoted to city people who live in and love their urban homes
Anatomy of a Brownstone: Green Roofs, Green Homes
A seminar devoted to the art and science of sustainable homes, NYC style
Saturday, April 26 Atrium Amphitheatre 300 Jay Street
2 sessions, (morning and afternoon) $40
10 am to 12 pm 300 Jay Street, Downtown Brooklyn
2pm to 4pm
Forum post/course schedule
439 Metropolitan -LEED Platinum Pt II
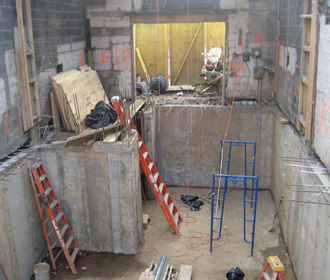
Last December we reported that NYC’s first LEED Platinum mixed use building project was underway in Williamsburg. I recently visited the site to interview architect Mark Helder for BCAT Brooklyn Review’s A Walk Around the Blog.
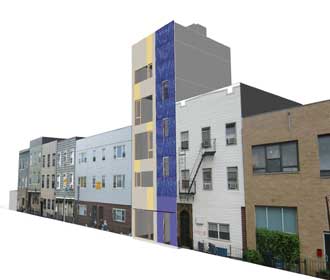
The building is slated for completion by July 2008. That seems a long shot at the moment (see photos), but Mark assures us that the most difficult part is behind him now. Because they saved the existing walls, underpinning the foundation was an arduous task.
The building will house Mark’s design studio on the ground floor and cellar and will have two residential duplex units above that. The first unit will be about 820 sf and the penthouse, about 1050 sf. Each apartment will have a private balcony and in addition, the penthouse will have exclusive use of the roof garden.
Because of the space constraints, the building was designed with as thin walls as possible while not sacrificing thermal or noise benefits.
I thought it was interesting that the greenest building in Brooklyn sits right near the BQE. But then again, that’s the ONLY kind of building that should be situated there. 100% of the ventilated air will be filtered to near HEPA standards. The building will have one of the best indoor air qualities in the city, far exceeding the American Lung Association’s standards for their Health House certification.
Heavy laminated glass windows will mitigate noise pollution. Concrete floors with an acoustically insulated radiant floor slab will further help with noisy neighbors.
See the blue on the front of the building? Solar panels.

Mark Helder moved to the states from Amsterdam when his wife Nikki felt it was time to reconnect after being away for a decade. Whenever he would visit NYC, he always looked around in astonishment at the abundant building opportunities. Lots of empty and smaller spaces and in general, an aging building stock with opportunities for improvement.
He also noticed that building technology followed the money and was of low standards as compared to what he used to in the Netherlands. Even though there were budgetary constraints back home, it seemed to him that the quality was higher even in the very low budget segments of the market. He feels it’s just what people are used to / demanding to get for their money.
Mark goes on: “In that sense it’s easier building green in the Netherlands, first, because it is a national consensus and people are aware of the long term maintenance effects when building a building which lasts for at least 50 years. Second, building standards and codes are kept up-to-date to the current (energy) developments. The minimum energy efficiency requirements are set to a relative high level in relation to the regularly available building technology and is updated every few years or so. In the US the minimum energy standards are relatively low and building a better performing building is basically voluntary. The gap between the minimum requirements and the regularly available building technology is large.”
Brooklyn Review airs Monday, March 10th on Time Warner channel 56 or Cablevision 69. Check listings for encore presentations. I’ll post the video here if it’s not completely embarrassing.