Skip to content

It’s the Little Things

It’s the Little Things published on

IMG_0534

Gosh, it’s so nice to work on pieces that just need some refreshing. While I spent all day yesterday gluing, cutting and fixing broken furniture with my sorry carpentry skills, Emilia actually got to finish some smaller projects that unconditionally rock.

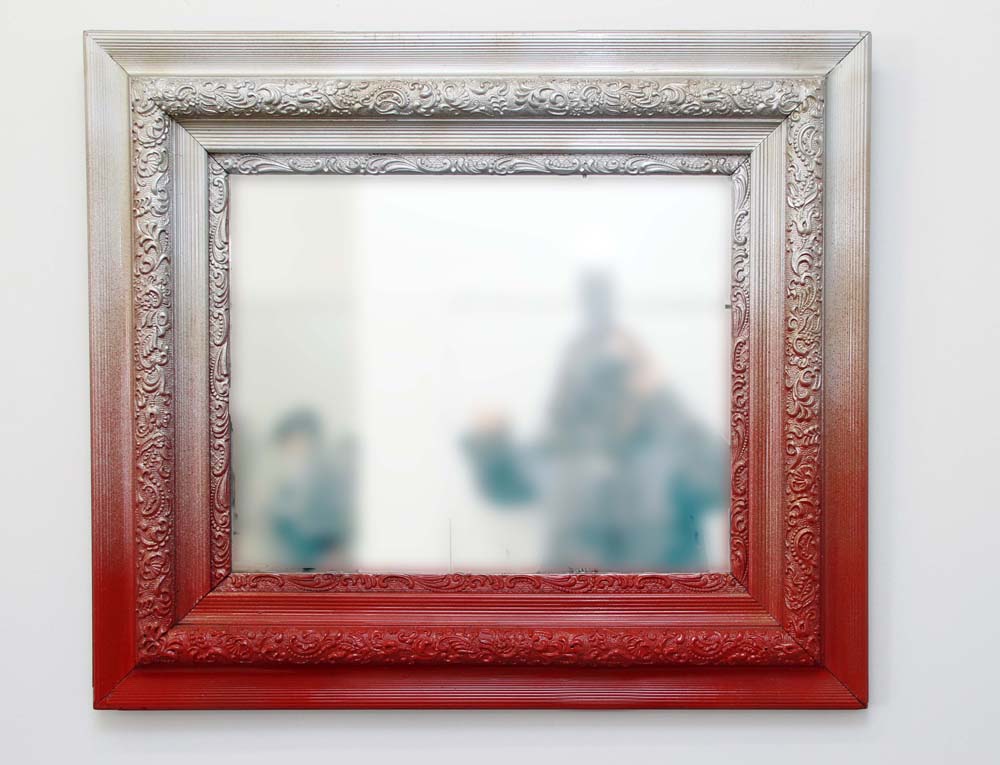
The gradation mirror was a white and gold antique mirror that needed some work and just wasn’t doing anything for us. The red to silver variation brought it back to life like an old Jew at an early bird buffet. (It’s ok for me to say that. I’m referring to my family).

IMG_0527

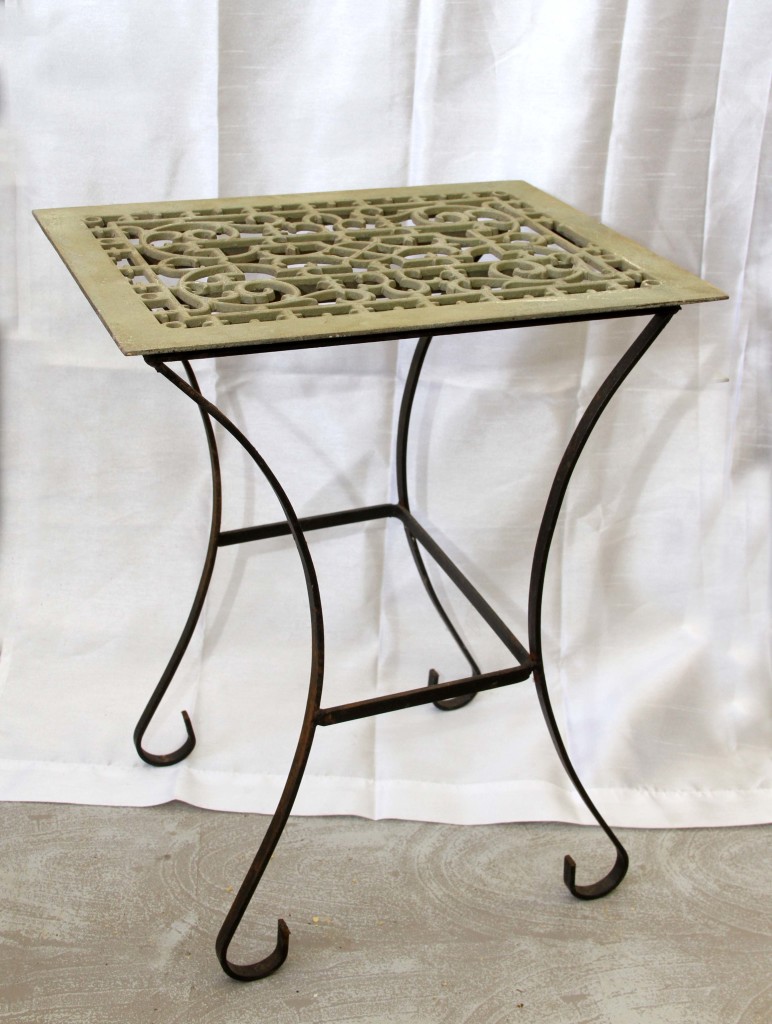
The table worked out quite well also. The little iron table lost it’s glass top when we were moving furniture around. The antique floor grill was just the perfect size! Expect to see some pieces made with those grills as I have collected a few for such projects. The problem is that they don’t come cheap, but the good news is that they’ll outlive all of us. Maybe that’s not such good news.

IMG_0502

More antique frames! These were finished last week but we didn’t get to highlight them. They were meant to sell individually but we love the way they hang on the wall together. Who needs to put photos or artwork in them when the frame IS the artwork?

Click on photos for more info on each item.

Animal Prints

Animal Prints published on

IMG_0468

Would love love love to find some great vintage fabric to reupholster chairs and such, but the show must go on with or without vintage, so we purchased new fabric. Zebras and leopards, oh my!

The four slate gray metallic chairs were made a set from two different pairs. Two and two and they look cool.

Here’s a before and after of the ottoman with iron feet. Both on sale in da shop. Word. Click images for more info.

12916304874_8c1bf2b8ba

IMG_0463

Wall Panels

Wall Panels published on 1 Comment on Wall Panels

01-vintage-charm

Do you ever wish there was something more interesting than sheetrock? Well, of course there is, sillies! You can cover existing sheetrock or crackling plaster with fun panels, but if you are down to the studs and want to use a sheetrock alternative, you would want to make sure that 1), you can insulate without it poking through and 2), you have enough studs to support each panel.

OMG, I love the paneling in the top photo. Do you know what that is? Just some crappy new wall paneling. Hung sideways. Painted and distressed. Yup.

4d1023922eeb83a350fb89789c72bf5b

To be honest, I’m not sure how this was done as the website isn’t working and I was only able to pull the Pinterest photo. What would I do to recreate this look? I’d start with the painted sheetrock and then unless I had several frames, I would do a cheater version and just run some furring strips across the entire wall to create the boxes. Or you can just create lines. Or you can use frames with varying sizes and shapes. Go ahead and miter every frame if you want. But me? I’d be too lazy to do that.

DecoratingTallWalls06This is an easier way of sectioning off the wall instead of frames and it’s lovely how they used wallpaper inside each frame.

101377099.jpg.rendition.largestThere’s a DIY tutorial for this veneer panel wall on the BHG site. Click on image.

abed0a4a93fd5ce0343acef19008c822

What about just stapling some fabric to a board and hanging it? Bam! Done!

Store Floor

Store Floor published on 1 Comment on Store Floor

smfloor

Deciding on a quick and easy solution to “busy up” the old vinyl tiled floor proved more of a task than actually painting the design. At the end of the day, we found one foam roller with a pattern lying around and rolled with it (pun intended). The whole thing took less than two hours, not including all the prep work. We went with the imperfect look. Today it gets poly and then we can start to find merchandise!

smfl2

Painted Floors

Painted Floors published on 4 Comments on Painted Floors

ebdd54f2abc8fb2ca4f25edec84cb453

Gee, ya think that would take too long to do? 

A few weeks ago we did a consultation/estimate for painted parquet floors. It was a piece of cake for us to go over some designs with the prospective client. Oddly enough, now that it’s time to think about the Reclaimed Home store floors, we haven’t got a clue what we want!

Since this is for a high traffic (hopefully!!!) retail shop and not a home, we want to follow certain self inflicted guidelines.

1. Less waste. Keep the nasty commercial tiles that are there and replace/patch as needed.

2. Quick and easy. We want to bring in some inventory ASAP!

3. Inexpensive. It’s a 2 year lease. We need to make money, not blow it all on renovations.

4. Durable. See high traffic above.

So, we are painting the tile. Sand it, clean it, prime, paint, seal. Sounds like a hassle but less so than removing all the tile and installing new flooring.

A solid floor would be easy, but we’re concerned that it won’t hide dirt well enough and who the F wants to mop every day? So we need a dirt distraction. Stencils are wonderful, but a pattern on the entire floor would be too time consuming. Same with faux wood grain. We need the fastest faux way out. So, what are our options?

No really, I’m asking you….know of any options?

9C2AC487ABCEA24E88EA4F95FE321E_h300_w400_m2_bblack_q99_p99_cxktMIsAi

Love the patina on this bathroom floor but concerned about the cost of the specialized paint for such a large area.

wall1Although not completely crazy about this technique, it does look like a quick solution.

Basement Floor and Angelia's Room etc 026

Faux stained and polished concrete. Definitely not these colors. We want to keep it light and happy.

Shipping Container Homes

Shipping Container Homes published on 1 Comment on Shipping Container Homes

exterior3-568x366

Housing in New York has become so expensive that it’s time to think of some outside-the-box options. Being an old home lover, it’s always been my ambition to rescue broken abodes. But what if it’s too far gone? What if it’s actually a tear down? What if building on an empty lot is more affordable?

The building or even renovation process in NY requires going through a lot of red tape. Although I haven’t researched local specifications for pre-fab homes, I know that even developers are going modular. Shipping containers? Might not be to code right here in NYC but they are worth looking into.

The photo above, via Jetson Green, is actually an affordable housing development in Canada. It would not look too out of place right here in brownstone Brooklyn. Definitely better than some of those other new builds.

Each unit costs $82,500 and the entire process took about 8 months to complete. This building, as with many other shipping containers, exceeds the code requirements for insulation. You were asking yourself about the insulation, amIright?

23594b6c29e60c67c312e2889be52f31

upcycled-shipping-container-house

Yes, my friends, the house above is a shipping container home. It’s actually three shipping containers located in China designed by Arcgency for World Flex Home. Be sure to hit that link and check out the interior shots.

EXTERIOR-1280-FINAL_sm

You can purchase the “Hela 1280” Meka modular house right online for $189,200. This is the largest and priciest of their homes at 1280 square feet. A 320 square foot home goes for $52,500.  The website says it takes 7 days to assemble and that includes everything except city water lines, electrical current and foundation. Of course, it does not include dealing with the DOB. Let’s also not forget that shipping the shipping container may cost as much as the actual house. The company ships worldwide with the headquarters being in Canada.

Six-Unit-Sustainable-Shipping-Container-House-7

If you’re saying “None of these look like shipping containers.” well, here’s one that does. The six container home was actually designed by students (friggin’ exceptional kids who aren’t drinking their youth away) and took two years to build (Ok, not THAT exceptional). The home boasts concrete floors, a roof deck and some exposed container interiors. Do check out the other pics, especially the exposed steel beams and support columns. It’s industrial looking yet totally homey and warm.

Ugh…and now I think I just found a new obsession.

Reclaimed Wainscoting Ideas

Reclaimed Wainscoting Ideas published on 2 Comments on Reclaimed Wainscoting Ideas

DSC_0526_1

Wainscoting breaks up a room and adds dimension to otherwise flat walls. Who says you have to buy wainscoting at your local big box shop or even use “wainscot” at all? There are plenty of materials that can be used to liven up those walls.

Good ole’ reclaimed boards will do the trick. Sure, tongue and groove would be more solid but you gotta work with what you’ve got. If what you’ve got are a bunch of old boards, go for it!

CTH621331.jpg.rendition.largest

Probably a tedious job, but the end result pays off. These vintage yard sticks are pretty ingenious.

a433db450ca69fa5039f72d69234cd06

Corrugated metal is THE way to go for an industrial look. Perfect for damp basements where one worries about mold. Rust isn’t as deadly. 😉

0df9212721395a48688bd60ff9b90292

Ok, so this wainscoting idea is made from new materials but you get the picture. Let’s say those iron scrolly objects can be any found material. They don’t have to be the same object either. What if each frame included a unique three dimensional object? What if it wasn’t three dimensional at all? Just frame different images or paint techniques? Maps? Collage? The possibilities are endless.

Concrete Wood

Concrete Wood published on

woodcrete

Wood is the esthetic building material of choice when it comes to fencing, floors and decking. The problem with wood is that it starts to wear down after time. Longer lasting options would be Trex, laminate or PVC fencing to name a few. It just feels wrong to replace a natural material with plastic. *It should be noted that Trex is mostly made up of recycled materials.*

We don’t always think of concrete as an alternative to wood, but it’s stronger and lasts a lot longer all while looking more tasteful than other synthetic options. Think of polished concrete countertops and floors.

Unpolished concrete is easier to DIY for the less skilled laborer and can end up looking just as fabulous. As with any concrete job, the form would have to be built, concrete poured and form removed when dry. The “wooden fence” above was created by such a technique. The bad news is that it’s the double the amount of work as installing a wood fence. You basically have to construct two fences and pour the concrete in the middle. If only one side is to be seen, you can cheat with a sheet of plywood on the hidden side. When the wood is removed, voilà, you have a “wooden fence” made out of a material that will last a lifetime.

Concrete can be tinted and let’s not forgot that it’s a fairly inexpensive material. Although controversial for the sake of nostalgia, many wooden boardwalks are now being replaced by concrete.

Etsy Switchplates

Etsy Switchplates published on

il_570xN.495525149_hp38

Every now and then you come across some real talent on Etsy rather than someone who’s handy with Mod Podge. Case in point is this sculptural switchplate above. $30 buys you a functional piece of art from Rusty Ventures.

il_570xN.465862533_t04v

Pretty in pink hand painted, distressed and protected cast iron plate. Ten bucks from Juxtapositionsc.

il_570xN.495675879_8mab

$15 from Vermont Slate Art. This toggle switch is made from recycled slate roof tile. They also have marble and granite, but IMHO, this is the nicest.

il_570xN.167954508

Hammer textured hot forged steel from Black Turtle Metals. This plate will last a lifetime for merely $20.

il_570xN.498940243_6j4d

And what switchplate collection would be complete without Morrissey? I tend to shy away from the glued image plates because they start to look raggedy after a while, but you can’t go wrong for eight bucks. You probably paid as much for your beer last night. From Gingersnap Press.

Primary Sidebar