
The broken plaster medallion came out of a Park Slope brownstone restoration about four years ago. I purchased a bunch of architectural salvage from these folks who were updating (raping) their historic home.
Fast forward to this past weekend. I finally repaired it.
Now, if you’re thinking I’m going to give you expert advice on how to successfully repair ornamental plaster, think again. A word of caution…this was all trail and error. So, I’ll share with you the mistakes I made so you don’t have to go through it yourself. Deal?
I couldn’t really find any DIY posts on this subject and I found out there was good reason. It’s a job for a skilled professional. The best article I found was from the government historic preservation site.
Ok, so DIY….
Well, my first idea which I thought was so brilliant, was to build a mold. I went to the useless Pratt Art Supply Store where not one of the four employees I asked knew anything about molds. Hello, art supply store? Know your merch! But I digress.
The resin mold might have worked fine if I wasn’t too lazy to build the perfect support to house it. Ah, but I was. I did a half ass job and the liquid mold dripped out. What was left of my mixture in the cup did harden quickly, so I’m thinking it may have work better if I let it set first to a jello-like consistency. But alas, I didn’t and the thin coat that was on the medallion was impossible to get off.
Take two. I’ll sculpt it myself.
I’ve never worked with Plaster of Paris before. Love the pre-mixed stuff too much. It took me a few tries of mixing the plaster to get it right. FYI, that shit hardens immediately! The trick is to a) use ice cold water and b) hit it with a spoonful of vinegar to retard the drying process. You still need to work fast, but at least it’s within the realm of possibility.
The mixture in the photo below was way too thick. It dried completely within like 2 minutes, leaving me no time to work.

Ok, this is where you might not want to take my word as gospel. Do your own research because I haven’t a clue if this is the right way of doing it. I just know that my medallion hasn’t fallen apart yet.
I started from the back. I had to support it somehow. I didn’t have fiberglass mesh in the house and this metal screen was just sitting there staring at me, so I figured WTF? It’s stiffer than mesh. Um, kind of like re-bar, right? I dipped paper joint compound tape into the plaster and used it to “paste” the screen backing. I also built it up on top of the tape. Think plaster cast or paper mache.

The next step was to build it up and start to shape it. Since sculpting is not my forte, I figured there would be some sanding involved.

Here’s the first glob. That took some hand sanding until I realized I could cheat with a Dremel tool. The Dremel worked great! One more application of plaster and some more sanding did a good enough job.

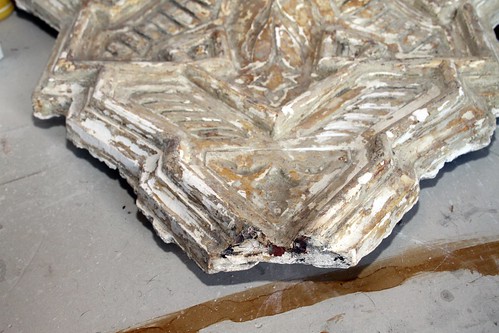
Oh, this is the unbroken side I was trying to replicate. Not bad for my first attempt at this stuff, right? Please be kind if you know I totally did it the wrong way. Just humor me.

2 Comments
Wow. That looks great. My aunt’s dad was an ornamental plasterer who worked on Radio City. I always look up when I’m there.
A compliment from someone whose aunt’s dad did the RC ornamental plaster! I’ll take it! Thanks!