
I found Yeshwant’s “DIY Green Roof” post on the Brownstoner forum and asked if he would be kind enough to give me some info to pass along to my ECO/DIY readers. Well, he went above and beyond my expectations! Thank you, Yeshwant!
Here are our reasons for wanting a green roof:
We bought an 1840s Federal brick rowhouse in Red Hook three years ago. Our top floor bedroom, with an uninsulated tar flat roof over it, sizzled in the summer heat. Finding a way to cool it was the main incentive to want to green the rooftop.
I also liked that green roofs prevent rapid heating and cooling of the roof membrane and are therefore supposed to more than double its life. The growth media and plants are supposed to help insulate the roof in the winter, which we hope will warm the usually chilly upper floor.
Red Hook is a flood zone and the storm drains often fail to carry away rainwater, especially during heavy summer storms. Many homes have storm water backing up into the drains. So, the mitigation of storm water volume could only help the community.
On summer mornings, we’ve also noticed that butterflies and bees seem to like sedum flowers. As do we.
Here is the process:
Ours is a DIY (from-scratch) modular green roof. We looked at the commercially available options and could not afford them yet (saving for a kitchen redo). We just wanted to try it out as an experiment before we spent much money.
I studied the research and current designs of greenroofs here and in Europe, and used them to come up with a very simple design.
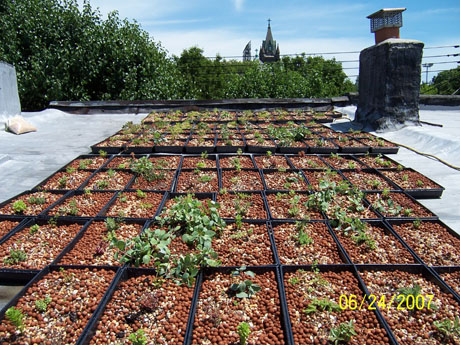
Over two weekends this June, my partner and I assembled nursery trays that now cover about 1/3 of our roof.
100 perforated trays (each tray slightly less than 2 sq.ft., with holes for drainage): $89 from Grower Supply. I would have liked to have used recycled plastic trays. Maybe a Garden Center will have used ones.
The nursery tray ‘modules’ were filled with a mix of locally available growing media: In each tray we mixed:
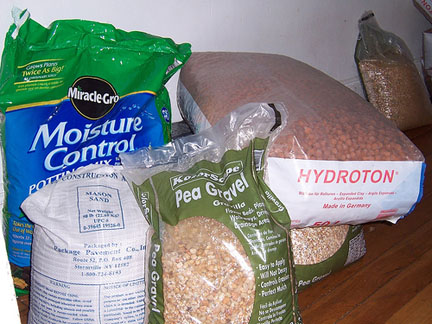
1. 8-10 cups (40-55%) Lightweight Expanded Clay Aggregate/ LECA/ Hydroton/ Grocorn/ Grorocks from a hydroponic store in Flushing, NY (Used 7 bags @ $30/ bag = $210). Price is now $34.95. LECA is lightweight porous clay balls. It is widely used in hydroponics. An advantage is that it allows rainwater to drain easily so the trays do not weigh the roof down especially when wet, and also keep the sedum roots aerated, dry and rot-free. It is imported from Germany and is used in many European green roof applications. However, because of it’s porous nature, it also tends to dry out easily, which is why it cannot be used alone.
2. 4-6 cups (20-30%) pea gravel (used 13 bags at $4/ bag = $52, from Lowes). I used this as a filler, and because the smaller particle sizes would allow better retention of water. I also could not afford more LECA.
3. 2-4 cups (10-20%) Mason’s / builder’s sand (used 4 bags @ $3/ bag = $12, from Lowes). Helps with water retention, but heavy when wet.
4. 2 cups potting mix (Moisture control from Lowes which contains coir; used 2-3 bags around $12/bag = approx. $36) or 2 cups Coir mixed with earthworm castings (mix available at Grow NY; used 2 bags @ $26.95/bag = $54).
This is the only organic component of the mix and it should be kept to a minimum as it will decompose over time and the media will settle too much. It also turns the pH acidic over time.
Coir in the mix allows long lasting and better moisture control than peat moss based mixes. You can use aged compost instead of the potting mixes, but my compost heap was not yet done. The City supplies free compost twice a year.
I also mulched with the pea gravel, sand and potting mix when the contents of the trays seemed to settle over time.
5. After a few months, I added slow release fertilizer to each tray (Osmocote).
I did not use any topsoil as the particles are too fine and would escape the trays. It also makes the mix heavy.
Other media that I would have liked to use were not easily available. These include: Permatill/Stalite, hadite, Turface, crushed brick, etc. When I add more trays I plan to use 80% Permatill (if I can locate a supplier) and 20% compost. That would make a simpler mix. The LECA/ Hydroton particles are too bulky (although wonderfully lightweight) and tend to blow about in the wind. Peagravel is a good particle size, but is heavy and I would like to use less of it.
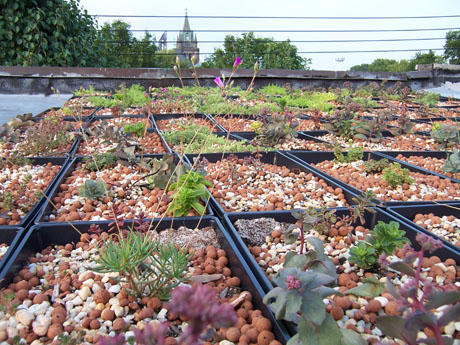
We planted several species of sedum and nonsedum natives [Talinum calycinum is an especially lovely one (see 1st & 2nd pics below), and seeds itself] and chives (Allium schoenoprasum), all grown in Emory Knoll Farms, a nursery that supplies plants for green roofs. Akio Enders at the nursery was very helpful in discussing the entire project and also recommended and sold me an assortment of plants at a discount (72 plugs for $137.75 incl. S&H).
We also have planted creeping thyme and some succulents (Portulaca, Delosperma Cooperi) already growing in our backyard. These are easily available at any garden center.
The cost: ($590 covers approx. 170 sq ft.) = $3.50/ sq. ft.
Disclaimer: Although the roof is working well for me, if others choose to do it I, of course, assume no liability for individual outcomes.
8 Comments
A good idea but you may need to check that your roof can take the added weight of the planters before you go crazy – this would probably mean calling an engineer or architect to evaluate:(
Good point! That’s why there’s a disclaimer at the end of the article, kids!
With our first home, we blew insulation into the attic crawlspace. Years after we sold it, the new owners developed a leak in their roof, which they probably didn’t address fast enough. Anyway, the insulation got weighed down from being wet and their ceiling collapsed. The roof itself had one too many fixes and probably needed to be taken up and replaced because of the weight of all of those layers. I don’t know if they did it or just added another layer.
I bet more and more people will be doing this. Having a professional green roof installed is cost prohibitive. If you fancy gardening, it’s an added plus!
in addition to getting an engineer’s evaluation, it’s important to use specially engineered soil for green roofs — it is designed to be lighter in weight even while absorbing much more water. there’s a place in the bronx that makes one called gaia soil.
doh… didn’t read far enough to see they have an entire soil recipe here!
[…] green roof example […]
[…] started on researching the DIY green roof options. I found a great resource of information on the Reclaimed Home […]
[…] green roof example […]