
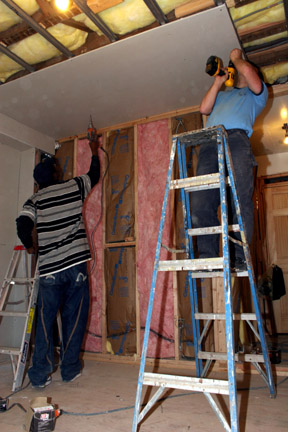
6’4″ guy and shorty husband
Our Bed Stuy bedroom is coming along! It’s only taken us a year to get to get some walls up. Ok, to be fair, we did put in a laundry room and bathroom in that time, but I know…still pretty lame. To be fair, it took a while to get the structural work done. Lots of repointing and sistering of joists, leveling floors, yada, yada.
Anyway, figure we might as well do a DIY post on drywall.
Tools:
Utility knife with many spare blades
Drywall Saw
T Square
Screw gun
Tape Measure
Router or Jigsaw
Materials:
Um…sheetrock
Drywall screws
1. All insulation, plumbing and electric is in place. Check? Check.
2. Measure twice, cut once. Measure twice, cut once.
3. Straight cuts: It’s easier to lean the piece against the wall than to cut flat. Measure and mark across the board. Use the T square as a guide while scoring with the utility knife. Score a few times and score the back paper, then snap. I use a karate kick. Wouldn’t recommend it though.
4. Start with ceiling first. You can make various tools to help hold the piece up, but if you have 2 people, you can use a broom or your head.
5. Measure for outlets, etc. Easier with a router. If you don’t have one, you’ll have to use a small saw. Either way, mark for box and drill/poke hole. Draw your outline. Using router, go slowly to the left. You can do this once the sheetrock is up and the inside of box will act as a guide. However, you must be careful not to cut wires! To router in place, stick router in just alittle deeper than sheetrock, then go left until you’re outside the box. Trace outer edge of box until cut is complete.
6. Don’t screw it up! Make sure you’ve marked ALL studs BEFORE you screw sheetrock in place. The studs are key. Do not let the end of the sheetrock overlap the entire stud because you’ll need to start the second piece on the same stud. All of the ends need to be screwed in so they are not flapping in the breeze. Professional drywall guys don’t always do this, but my anal husband likes to space the screws 8-10 inches apart. Common recommendation is 12-16 inches. Be careful with the screws. You want them to slightly puncture the paper, not go all the way in. On the other hand, make sure they aren’t sticking out.
7. Tip: If you’re doing a basement or other damp area, DO NOT take drywall all the way to the ground as it will act as a wick that soaks up water. Keep it about 1/2 inch off ground. We learned this the hard way.
10 Comments
this wold be more fun if your husband wore half-shirts ala the early 1980’s. Just sayin’.
Just a tip: Do NOT punture the paper, it makes the sheetrock weak. Just get the screw in to the point where it dimples the paper, but does not break through it. Then apply joint compound with your drywall knife over the dimple. May have to repeat.
Taping is more difficult. I have always foudn the fiberglass perforated selfadhesive tape, much much easier to work with than the paper.
Thanks, Yeshwant. Dimple, not puncture. You won’t find me doing a taping post because I am TERRIBLE at taping! That’s the one thing we have to have to bring in a pro for.
Upstate, yeah, that’s just his style.
6’4″ guy can reach the ceiling without fully extending his arm?? What a tiny room this must be 🙂
Well, we’re tiny people.
Buy a special drywall dimple screw bit for your drill. Takes all the guesswork/annoyance out of how far to drill your screws. They have a spring inside them so the bit pops back and prevents you from puncturing the drywall.
They range in price from like $6 to $14 at most hardware stores.
How come my husband didn’t know about that gadget? He just takes the drill away from me because I’m too heavy handed. BTW, he was supposed to write this article for me, but didn’t follow through. So if it seems like I don’t know what I’m talking about it’s because I don’t. 😉
Chutzpah,
the room is not tiny – the walls are 8′-4 – the guy is 6′-4″ + arm say 1′-4″ + drill 8″ min = 8′-4 QED
Hubbie,
Tnx for the followup. I guess I am too used to my 12′ walls. Do we build ’em bigger out here in Queens?
Chutzpah, Hubbie is at work right now. This is Wifey. The apartment is the garden level of a brownstone…or the basement level. Our Brooklyn parlor level ceilings can kick your Queens walls any day of the week! 😉