
Author: Emilia
I have been working on doing some distressed wall techniques these last few days. It’s pretty easy and fun, mostly because you can’t go wrong when making something look damaged and aged. The process consists of joint compound, paint and weathered crackle.
Step 1: Trowel joint compound on wall in sort of a textured manner. Whatever texture you would like it to be. Let it dry.
Step 2: Paint your colors on the dry joint compound. You can use several colors applied to different areas or just one, depending on your taste. Let it Dry
Step 3: Brush on Weather Crackle (I use McCloskey Weathered Crackle Glaze)
Let it dry.
Step 4: Now brush on another color on just some areas and let the crackling begin. You can go wild on this or you can go simple. Let it Dry.
Step 5: Now you can apply now some more weathered crackle. Let it dry.
Step 6: Trowel joint compound in sections of about a square foot. Let it set up so it’s not completely dry yet, but workable. You can tint the joint compound with your top color or you can let it stay the color of the compound which when dry has a cement look.
Step 7: Get some brown craft paper and apply it the square foot of joint compound at a time. Pat down lightly and the peel off. The compound lifts off to reveal the paint underneath. You can put more pressure on the paper or less depending how much of a peel paint effect you want.
Keep repeating step 7 until your wall is complete.
So there you go…hope you can have a chance to try this sometime. Please feel free to ask me any questions or have me do this or another faux paint technique for you. Enjoy!

17 Comments
Hey, you put two of the same picture up…I sent you 3…..what gives???
Ok, ok! I fixed it. Jeez.
Thanks Sor:)
Very cool!! I think Hallie at Holy Hudson is working on a similar project for her hallway.
cool! they look like old venitian crumbling walls.good job !
Hi Emilia,
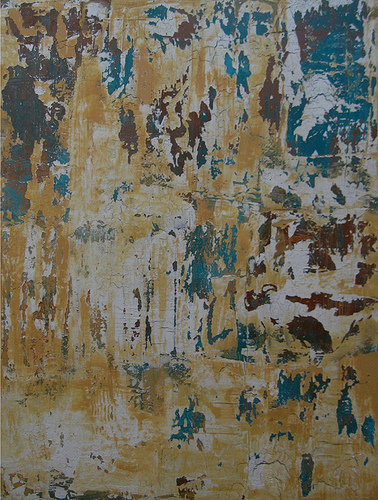
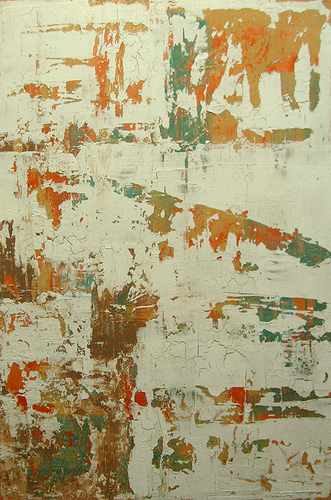
So love the wall techniques. From the first pic, can you tell me which was base color, then color applied next, etc. Trying to determine from the colors I’m using, which will show the most and if is according to the order in which applied. And curious from last pic if the same technique was used just heavier with crackle glaze?
Thanks.
Hi Elizabeth,
Thanks for the comment.
Well the process I wrote pretty much explains it. You can use whatever colors you like after the first step of appying the joint compound. I used just a mix of the orange , yellow ochre and greens sort of sporatic like an abstract painting and then when that dried I applied more joing compount and lifted it off when semi dry(as explained above) and then put other colors like browms..you can keep doing this and use as many layers until you get the desired look you want.
yes the last technique is the same only using more weathered crackle.
Hope this was of some help..if you have any further questions please feel free to contact me. If you are not getting the look you want I could do it for you.
Hi Emilia.
I am in love with this look and would like to try to create something like it as a feature wall in my entry way. Does it matter what kind of paint you use for the colours? And what do you recommend tinting your joint compound with?
Thank you,
Candice
[…] Wall tutorial from Reclaimed Home […]
[…] DIY: Emilia over at Reclaimed Home shows you her technique for making the new look old again. 2. Distressed Wall Coverings: Those […]
This is cool! I’ve been looking for a tutorial like this for ages! Has anyone tried using chalk paint with this method? For a more matte finish? Did you put any kind of top coat on for protection or will it just keep crumbling? I’d like to do this in really light sage green, grey, cream and light browns….suggestions for the layering? I’d like the cream to be the top layer! Thanks!!!
Hi Becky,
That color scheme sounds great! You can get those 4 colors and play with them to see what looks best before attempting it on the wall. Figuring out what looks good is the hard part. Get a primed piece of sheetrock or wood and run some tests.
A sealer is always a good idea for whatever technique you do, especially with multiple layers of cracked paint. You can buy totally matte finish online or at art supply stores if you can’t find them at your local hardware store. That might negate the need for chalk paint unless you really want to draw on it. Hmmm….draw on sections with “crumbling” around the edges. That could look cool, actually!
That’s embarrassing…I meant milk paint. (I just got done using chalk paint on something else.) 😉
Thanks for the quick response! I can’t wait to give it a shot!
[…] of you have already met Emilia through her DIY articles here or even back in the day when we did the Brooklyn Flea together. Well, now she’s […]
Sorry if this seems like a silly question. In step 6 it says “trowel sections of 1 sq ft” your just saying take it a foot at a time. your not actually letting it get “half way set up” before you do the next square foot right?
Thanks
Where r u located?
Would love to hire u to do a wall
Brooklyn, NY